Home → Cataloging Items/Copies and Holdings → Printer Friendly Version
Cataloging Items/Copies and Holdings
This document outlines the general workflow for Item Catalogers to add new copies ot titles that already exist in the NC Cardinal shared catalog, as well as other functions related to the Item Cataloger profile group. Instructions for functions such as adding new call numbers and copies, editing item attributes, creating and working with Item Buckets, and applying Item Notes, Tags,and Alerts are included, along with an overview of relevant policies.
- 1. Item Cataloging Basics
- 2. Item Interfaces
- 3. The Holdings Editor
- 3.1. Accessing the Holdings Editor
- 3.2. Adding New Items to Existing Records
- 3.3. Adding Call Numbers and Items in the Holdings Editor
- 3.4. Setting Holdings Editor Preferences
- 3.5. What Are Item Attributes?
- 3.6. Item Attribute Definitions
- 3.7. Circulation Modifiers
- 3.8. Shelving Locations
- 3.9. Item Statuses in Evergreen
- 3.10. Item Attribute Templates
- 4. Selecting Matching Bib Record
- 4.1. Matching Record Basics
- 4.2. Matching Specialized Materials: Graphic Novels & Manga
- 4.3. Matching Specialized Materials: Multi-Volume & Multi-Part Sets
- 4.4. Matching Specialized Materials: Juvenile & Young Adult
- 4.5. Matching Specialized Materials: Videos
- 4.6. Matching Specialized Materials: Kits
- 5. Item Actions
- 6. Processing New Items
- 7. Customized Item Messages
- 8. Transferring Holdings
- 9. Item Buckets
1. Item Cataloging Basics
1.1. Item Cataloging Training Slides & Videos
Item Cataloging Training
NC Cardinal provides multiple materials to aid in training for item catalogers.
Niche Academy
Niche Academy offers access to a variety of self-paced modules focused on cataloging. Access all cataloging modules in the Cataloging category of the NC Cardinal Niche Academy.
Video training
There is now a video playlist on YouTube for the Item Cataloging Training session taught by Dr. Sonia Archer-Capuzzo on May 16, 2018.
Click on the card (above) to link to the presentation slides.
1.2. The Item Cataloging Workflow
What is Item Cataloging?
On This Page
When cataloging items in NC Cardinal's shared catalog, first find a matching bibliographic record, then add your holdings and add local holding information by editing the Item Attributes.
Words to Know
Holdings: The locally owned and managed Volumes (Call Numbers) and Items (individual Copies) attached to title records.
Item Attributes: Local holding metadata that includes information about where an item is located in the physical library. Further details impacts how the item circulates and where and how it may be targeted to fulfill hold requests.
In NC Cardinal, the process of item cataloging involves finding a bibliographic record that matches the item you wish to catalog and attaching your item to that record.
Item Cataloging Process
- Search the NC Cardinal shared catalog for a record that matches the item you are adding to your library.
- Verify that the record you select is a match.
- Add your holdings.
- Edit Item Attributes to set how the item will function in the catalog.
- Complete any physical processing.
- Once the item is ready to be made available to patrons, scan it in the Checkin screen.
Note: Always use the "Re-Target Local Holds" Checkin Modifier when checking in newly cataloged items to ensure they are considered for any active hold requests.
1.3. Item Cataloging Assessments
Required Assessments for Item Cataloging Permission
On This Page
Staff who will be doing any copy/item cataloging need to have Item Cataloging permissions. In order to be granted Item Cataloging permissions, catalogers must pass an assessment. The assessment covers questions related to NC Cardinal standards, identifying the correct MARC fields to use for different aspects of a record, and matching items to the correct bibliographic records.
Before you can begin work as a cataloger, you will need to pass an assessment and be granted Item Cataloging permissions. You can find the assessment in the NC Cardinal Niche Academy.
What Can You Do with Item Cataloger Permissions?
Item Catalogers assist in the cataloging process and manage local holdings. After passing the Item Cataloging Assessment, they can:
- Attach holdings to and remove holdings from existing bibliographic records
- Edit call number and item level data
- Create and edit monographic parts
What Does the Assessment Cover?
The Item Cataloging Assessment is the first in a set of embedded assessments meant to check your knowledge of NC Cardinal cataloging standards and best practices. Many of these standards are specific to NC Cardinal policy, and do not necessarily reflect current international standards for Cataloging as outlined in RDA!
The assessment is divided into three sections:
- Multiple Choice
- Matching Fields
- Evaluating Records
For the Multiple Choice, you will be asked a series of questions related to NC Cardinal standards, and the responsibilities assigned to Item Catalogers. For the Matching Fields, you will answer questions about RDA, and identify the correct MARC fields to use for different aspects of a record. For Evaluating Records, you will have access to a separate document containing images of resources and corresponding MARC records. You will need to choose the appropriate record to go with the item.
To pass, you will need to achieve a minimum score of 95% in each individual section. You may take the assessment as many times as necessary.
When Will Permissions Be Assigned?
After passing, you can expect to have your permissions updated within a week. If you need permissions updated sooner, or it has been a week and your permissions have not changed, please submit a help ticket.
Note: You must already have a staff login account in order to be granted Item Cataloger permissions. If you do not yet have a staff login account, please reach out to your library's System Login Access Manager (SLAM) and request this account before you take the assessment.
1.4. Training and Learning Resources
Item Cataloging Training Resources
On This Page
NC Cardinal provides training resources for staff as they prepare to take the Item Cataloging Assessment, or need refreshers and training while on the job. Other consortia offer good training resources as well and those we recommend are listed below.
Niche Academy
You can find several self-paced learning modules in NC Cardinal's Niche Academy.
YouTube
NC Cardinal records all of our webinars to post on YouTube. You can view a playlist of recordings related to Item Cataloging.
External Resources
You can view a playlist of videos related to Item Cataloging from the BC Libraries Cooperative on their YouTube channel.
2. Item Interfaces
2.1. Item Status Screen
Viewing and Working with Items in the Item Status Screen
On This Page
The Item Status screen displays details about items that the user has scanned or uploaded. Users can access it through the Search menu, Circulation or Cataloging menus, or directly from an item's Bibliographic record. The screen enables various actions on selected items, including adding to item or record buckets, placing holds, deleting, checking in or renewing items, updating inventory, and editing holdings.
The Item Status screen includes a grid that lists items that are either scanned or uploaded to appear in the grid.
Multiple Ways to Access
- From Search menu choose Search for Items by Barcode
- Select Item Status from the Circulation or Cataloging menus
- On the item’s Bibliographic record page, click View next to the item’s barcode, then click List View.
Adding Items to the Grid: One at a Time or in Batch
One at a Time
You can look up items in the Item Status screen one at a time by scanning the barcodes.
In Batch
If you have a list of barcodes, such as from a report, you can upload all of them into the Item Status screen at once.
- Format your list of barcodes by removing all other data and saving the file in a .CSV format
- Click the Choose File button at the top of the Item Status screen.
- Choose the .CSV file with your barcodes.
Managing the Grid
Like all grids in Evergreen, you can change the information you see in the list of items in the Item Status screen. To do so, Click the Gear icon to open the Grid Management menu. Any columns with a green check mark can be removed from the view. Any columns with a yellow X can be added. When you're done, be sure to click Save Columns.
What Can You Do From This Screen?
The Item Status Screen allows you to take actions on items, either one at a time or in batch. To select the item(s) you wish to take action on, just check the box on the far left of the grid line for that item.
Once you have selected the item(s) to work with, you can select your action from the Actions menu.
There are a large number or potential actions. The most common include:
- Add Item to an Item Bucket
- Add Item to a Record Bucket
- Place holds on Items using the Request Items action
- Delete Items
- Check In Items
- Renew Items
- Cancel Transits
- Update Inventory
- View Item Holds (Copy Level)
- View Record Holds (Title Level)
- Print spine or pocket labels
- Mark Items Damaged, Discard/Weed, or Missing
- Add new copies to an existing volume
- Edit Holdings, including call numbers and item attributes
- Replace barcodes
- Transfer Items
2.2. Item Detail View
Looking at Items in the Detail View
On This Page
The Item Detail view contains six tabs that provide information about a specific copy. The Quick Summary shows the item's attributes, the Recent Circ History and Circ History List both show details about the two most recent circulation transactions, the Holds/Transit Tab gives details about the current hold if the item is on the hold shelf, and details about the most recent transit, the Cataloging Info tab contains the MARC record, and the Triggered Events tab lists information about circulation- and hold-related notifications.
To view details about a specific item, find the item using its barcode in the Item Status screen, then click the Detail View button to see its summary, circulation history, triggered events, and MARC record information. You can also view the item details from the Bib Record: click the View link next to an item's barcode to access the Item Status screen and then select Detail View.
To Access from the Item Status Screen
- Navigate to Item Status.
- Scan the barcode.
- Select the item by checking the box to the left of the line on the grid.
- Click the "Detail View" button above the menus.
Note: You can return to the Item Status screen from the Item Detail View by clicking the "List View" button next to the Action menu in the top right of the Detail View page.
To Access from the Bib Record
- Navigate to the Bib Record.
- In the Item Table tab, locate the specific copy you want to view.
- Click the "View" link under the barcode.
What's Available in the the Detail View?
You can navigate the detail view utilizing the tabs underneath the record summary. The tabs include:
- Quick Summary
- Recent Circ History
- Circ History List
- Holds/Transits
- Cataloging Info
- Triggered Events
Quick Summary
The first tab in the Item Detail interface is the Quick Summary. This shows a non-editable summary of the Item Attributes assigned to this copy, as well as brief information about the item's current status and circulation details.
Note: One of the detail fields in this page is labeled Duration Rule. This field is filled based on the duration rule that was applied to this item at the point of its last circulation. This rule should not be assumed to apply to future circulations. If the previous circulation transaction was conducted at a different library, or other aspects of the circulation policy, such as the patron type, are different at the next transaction, a different policy with a different duration rule may apply.
Adding and Managing Item Alerts
This tab primarily provides information about the item. There is only one available action, which can be conducted by Item and Bibliographic Catalogers: Adding and Managing Item Alerts.
For More Information
Instructions on adding and managing Item Alerts is available in the Item Alerts page in this knowledge book.
Recent Circ History
The second tab in the Item Details Interface shows Recent Circ History. This shows details about the current circulation, and one previous circulation. The details included are:
- Patron (hyperlinked to their account)
- Total Circs includes the number of times the item has been renewed, plus 1 for the initial checkout.
- Date the item was Checked Out
- Workstation where the transaction occurred
- Date of last renewal (if any)
- Workstation of last desk renewal
- The action that caused fines to stop accumulating (Stop Fines Reason). This may include Checkin or Marked Lost.
- The timestamp for the Stop Fines Reason (Stop Fines Time)
- Checkin Time (this is blank if the item is still checked out)
- Checkin Scan Time
- Checkin Workstation
Circ History List
This tab include the past 2 circulations. The details included in this page are essentially the same as the details included in the Recent Circ History tab.
Holds/Transits
This tab includes two sections: one that lists details about current holds and one that lists details about current transits.
Current Hold
- Patron name and barcode (hyperlinked)
- Requestor name and barcode/username (hyperlinked)
- Library where the item will be picked up
- Library where the item was originally shelved
- Request date
- Capture date
- Date and time the item was placed on the hold shelf
- Date the hold will expire from the hold shelf if not picked up
- Date the hold request will expire if the capture is not completed
- Whether or not the item is being held at the desk instead of on the hold shelves
Most Recent Transit
- Library the item is being shipped from
- Library the item is being shipped to
- Date the item was put in transit
- Date the transit was received (if any)
- Date the transit was cancelled (if any)
Cataloging Info
This tab contains a non-editable MARC record.
Triggered Events
The Item Triggered Events Log displays automatic notifications sent to patrons for the specific item being viewed. Notifications to multiple patrons will be included in the event log for an item. The Triggered Events Log separates Hold Events and Circulation Events into their own tabs.
Circulation Events include:
- Predue notices
- Overdue notices
- Autorenewal notices
- Mark Item Lost events
- Mark Item Long Overdue events.
Hold Events include Hold notifications.
Available Actions
There are two available actions, Cancel Selected Events and Reset Selected Events.
- Cancel will set an event to invalid.
- Reset will set an event back to pending.
2.3. Holdings Editor
What is the Holdings Editor?
On This Page
The Holdings Editor serves as a unified interface where Item Catalogers can manage call numbers and copies, and the attributes used by Evergreen to determine circulation and hold policies.
Words to Know
Holdings: The locally owned portion of a record, specifically the Call Number (Volume) and Copy (Item).
Item Attributes: Details attached to individual copies that tell Evergreen which circulation and hold policies to apply, as well as metadata, such as alerts, notes, and statistical categories, that should be attached at an item level, rather than at a shared bibliographic level.
The Holdings Editor is a single interface from which Item Catalogers can add call numbers and copies, together known as holdings, create the attributes Evergreen uses to apply circulation policies, edit the options available within the interface, and create and manage templates for these attributes.
Holdings Tab
The Holdings tab allows Item Catalogers to add call numbers and copies for their library to the bib record.
Item Attributes Tab
The Item Attributes tab allows Item Catalogers to set the details that tell Evergreen how the item should function within the ILS. Attributes are divided into categories:
- Identification
- Location
- Circulation
- Cost and Condition
Additionally, Item Catalogers can add and manage Item Alerts, Tags and Notes, as well as entries to item-related Statistical Categories.
For more information on the Item Attributes, please refer to the Adding Call Numbers and Items in the Holdings Editor page.
Note: Some catalogers find it easier to view the Holdings tab and Item Attributes tab in a single screen. You can set this in the Preferences tab (see below). It's the last option in the Holdings Preferences box.
Preferences Tab
By default, all available holdings details will appear in the Holdings tab and all available item attributes will appear in the Item Attributes tab. If your library does not use some of these details or attributes, you might wish to hide them. You can do so in the Preferences tab.
Administration Tab
In this tab, Catalogers can create, edit, delete, import and export Item Attribute templates. Templates allow catalogers to quickly apply standard attributes as they catalog.
This tab was created in the upgrade to version 3.15
For More Information
You can learn more about Cataloging Templates in the Item Attribute Templates page.
2.4. Holdings View
Working with Items in the Holdings View
On This Page
The Holdings Editor serves as a unified interface where Item Catalogers can manage call numbers and copies, and the attributes used by Evergreen to determine circulation and hold policies.
The Holdings View is a tab in the Bibliographic Record that allows Item and Bib Catalogers to make minor changes to location information about an item or call number. Most specifically, this interface is useful for moving items to different branches or call numbers.
Scoping
You can change the scope of the items by owning library in the Holdings Maintenance field at the top of the grid.
Cardinal: Scoping to Cardinal will include holdings for every branch in every system within the consortium that owns a copy attached to the bib record.
System: Scoping to your system will include holdings for every branch in your system that owns a copy attached to the bib record.
Branch: Scoping to your branch will include only the branch selected, whether it has copies attached or not.
Changing the View
You can change the way holdings are displayed in the grid by checking the boxes underneath the Holdings Maintenance field at the top.
Show Call Numbers: Selecting this box will automatically expand all branches within the scope of your view to show the Call Number level of that branch's holdings.
Show Copies: Selecting this box will automatically expand all branches and call numbers within the scope of your view to show the Copy level of that branch's holdings.
Show Empty Call Numbers: Selecting this box will automatically expand the grid to include call numbers even if there are no items attached.
Show Empty Libs: Selecting this box will automatically expand the grid to include every branch within the set scope, even if that library does not own a copy or have a call number for the title.
Action Menu
Catalogers can select barcode-level copies, call number-level volumes, and library branches from the grid, then perform a variety of functions on the selected assets using the Action Menu. Some of the most commonly used actions are:
- Print Labels
- Place Holds/Request Items
- Add Call Numbers/Items
- Add Items to Item Buckets
- Add and Manage Item Alerts, Notes, and Tags
- Delete Holdings
- Edit Call Numbers and Items
- Replace Barcodes
- Mark Items Damaged or Missing
- Mark Library/Call Number as Transfer Destination
- Show Item Holds
- Show Item Status (Detail or List view)
- Show Triggered Events
- Transfer Holdings or Items to Marked Destination
3. The Holdings Editor
3.1. Accessing the Holdings Editor
How to Get to the Holdings Editor
On This Page
There are five main portals for accessing the Holdings Editor: from the Item Status page, from the Item Table in the Bibliographic Record, from the Holdings View in the Bibliographic Record, from the Add Holdings button in the Bibliographic Record, and from an Item Bucket. Instructions for each method and recommendations on which method to use in different circumstances are included on this page.
The Holdings Editor is the main interface used to apply and edit item attributes. There are multiple ways to access the holdings editor.
From the Item Status Page
After scanning an item or uploading a file:
- Select the item from the grid by checking the box.
- From the Actions menu, choose Items from the "Edit" section.
From the Bibliographic/Title Record
There are actually three ways to access the holdings editor from within a bibliographc record.
From the Item Table
- Navigate to the Item Table tab of the title record.
- Locate the barcode for the specific copy you want to edit in the Barcode column of the grid.
- Click the Edit link underneath the barcode.
- This will open the Holdings Editor in a new tab, leaving the bib record open in the original tab.
From the Holdings View
- Navigate to the Holdings View tab.
- Locate the copy you want to edit within the holdings grid.
- Select the copy by checking the box on the barcode line.
- Choose Edit Items from the Actions Menu.
Using the Add Holdings Button
This button opens a blank holdings editor. Once you have filled it out with the minimum required metadata and saved, you will have created a new copy.
For More Information
You can find more details about this process in the Adding Call Numbers and Items in the Holdings Editor page.
From an Item Bucket
- Open the bucket with items to be edited.
- Select the item to be edited by checking the box in the item grid. You may select more than one and the Holdings Editor will include attribute details for each item selected.
- Choose Edit Selected Items from the Actions Menu.
3.2. Adding New Items to Existing Records
Manually Adding Copies to an Existing Record
On This Page
When cataloging newly purchased items, you can attach new copies to existing bibliographic records.
Words to Know
Holdings: The locally owned portion of a record, specifically the Call Number (Volume) and Copy (Item).
Volume: The Volume primarily refers to the call number. This is where ownership is designated. A single call number may have multiple copies attached.
When to Manually Add Holdings
Local Holdings are often added by bibliographic catalogers or Acquisitions Specialists as part of the process of importing MARC records. For more on how local holdings are added through these methods, see the following pages in the Bibliographic Cataloging book and the Acquisitions Book:
- Batch Import Bibliographic Records
- Load MARC Order Record (for Acquisitions)
When importing records via Z39.50 or after discovering an existing record for the item to be added, Item Catalogers should manually add the local holdings information.
How to Manually Add Holdings
There are two main places from which you can manually add holdings.
- From the Add Holdings button in the Bibliographic Record summary
- From the Holdings View tab in the Bibliographic Record, select your branch and choose Add Call Numbers and Items from the Actions Menu.
Both of these options will direct you to the Holdings Editor. In the Holdings Editor, you will need to:
- Add Holdings
- Set Attributes
Adding Holdings
- Create at least one call number for each branch that will own a copy of the title.
- Supply barcodes for each copy you are adding.
For More Information
Check out the page Adding Call Numbers and Copies in the Holdings Editor chapter of this Knowledge Book for more details about adding call numbers.
Setting Attributes
You can use templates if you have them for the item type you are cataloging. See the page on Item Attribute Templates for more information on setting these up.
To set Attributes manually:
- Click the attribute name.
- Perform the relevant action (click a radio button, select a list option, or open a pop-up box).
- Click Apply All & Save.
For More Information
Check out the page What Are Item Attributes? in the Holdings Editor chapter of this Knowledge Book for more details about setting Item Attributes.
3.3. Adding Call Numbers and Items in the Holdings Editor
Adding Holdings: Call Numbers and Copies
On This Page
Instructions for adding new call numbers and individual copies attached to those call numbers.
Words to Know
Holdings: Within the cataloging structure, the holdings are the locally owned and managed parts of the record. Specifically, the volume and copy levels.
Volume: The Volume primarily refers to the call number. This is where ownership is designated. A single call number may have multiple copies attached.
Copy: This is the physical item. In some instances, it may be referred to as an Item. It is identified by a unique barcode.
Evergreen utilizes the Holdings Editor to add and modify holdings, both call numbers (volume level) and copies, in the catalog. To create individual copies of items that will be findable in the catalog and follow the circulation policies you set in your library, you must first create a call number record for your branch, and then attach barcoded copies to that call number record.
Regardless of how you access the holdings editor, once there, item catalogers can create new call numbers and barcodes, and apply Item Attributes to manage how Evergreen allows staff and patrons to interact with materials.
Creating Volume and Copy Records
From the Holdings tab in the Holdings Editor, you can create holdings records individually or in batch.
- In the Holdings Editor, navigate into the Holdings tab.
- Use the plus sign icon to the right of your branch name to add lines for every copy you will be adding. If you are adding copies for multiple branches, you can change the branch in the drop-down menu from that icon.
- Fill in the classification scheme, call number prefix, call number label, and call number suffix. This can be done row by row, or in the Batch Add section at the top. If using Batch Add, click the apply button after filling in the fields to autofill the information in each row below.
- Add a barcode for each item.
- The Item # field refers to copy numbers. If your library utilizes copy numbers, fill them in here.
- You will see a yellow "Changes Pending" alert at the bottom of the screen.
- Click Apply All & Save if you will be adding Item Attributes right away or Apply All, Save & Exit to leave the holdings editor.
3.4. Setting Holdings Editor Preferences
Customizing the Holdings Editor
On This Page
Hide unnecessary fields, unify the view of the Holdings Editor, and change attribute behaviors in the Preferences tab of the Holdings Editor.
In the Holdings Editor, users can customize their view in the Preferences tab.
The content of this tab is divided into 4 sections:
- Holdings Display Preferences: Determine which fields related to call number creations you want to have visible. For example, if your library does not use Call Number Prefixes, you can hide this field in your Call Number editor.
- Holdings Creation Defaults: Set standard values for the Classifications, Prefix, and Suffix fields in the Call Number editor.
- Item Attributes Behavior: Determine how certain Item Attributes will function in relation to others.
- Hide Item Attributes: Determine which Item Attribute fields you want to have visible in the editor.
Holdings Display Preferences
| Display Preference | Description |
|---|---|
|
Hide Call Number Classification Column |
Select this to hide the call number classification column in the call number editor. |
|
Hide Call Number Prefix Column |
Select this to hide the call number prefix column in the call number editor. It will also hide the call number prefix field from the Item Attributes Editor. |
|
Hide Call Number Suffix Column |
Select this to hide the call number suffix column in the call number editor. It will also hide the call number suffix field from the Item Attributes Editor. |
|
Hide Generate Barcodes |
Select this to hide the Generate Barcodes button at the bottom of the Item Attributes Editor. If Generate Barcodes is selected in the Item Attributes Editor, barcodes will be automatically generated according to settings established by your Evergreen administrator. |
|
Hide Use Checkdigit |
Select this to hide the Use Checkdigit option at the bottom of the Item Attributes Editor. If Use Checkdigit is selected in the Item Attributes Editor, a barcode that does not meet the checkdigit parameters will turn outline of the barcode field red. |
|
Hide Item Part |
Select this to hide the part column in the call number editor. |
|
Unified Holdings and Item Attributes Display |
Select this to show the call number editor and item attributes editor in one unified display. This is recommended. |
Holdings Creation Default
| Creation Default | Description |
|---|---|
|
Classification Scheme |
By default Evergreen will use the classification scheme specified by the library setting Default Classification Scheme. The holdings creation default lets you specify Generic, Dewey, Library of Congress which will override the library setting. |
|
Default Prefix |
If your library uses Prefixes select the one you’d like used as a default. All new holdings will be populated with this prefix. |
|
Default Suffix |
If your library uses Suffixes select the one you’d like used as a default. All new holdings will be populated with this suffix. |
Item Attribute Behavior
| Attribute Behavior Setting | Description |
|---|---|
|
Change Circ Lib When Owning Lib Changes |
Selecting this checkbox will automatically update the Circulation Library field if the Owning Library field is changed. |
|
Default Stat Cat Library Filter |
Selecting an Organizational Unit from the dropdown will default the displayed Item Statistical Categories to those owned by the selected Organizational Unit or its ancestors. |
|
Default Item Alert Type |
Selecting an Item Alert Type from the dropdown will default any newly added item alerts to the selected type. |
Hide Item Attributes
In this area, you can check the boxes next to fields you don't use in your library to hide them from the Item Attributes form.
For More Information
To find details about each field, please review the Item Attributes Definitions page.
3.5. What Are Item Attributes?
Item Attributes: an Overview
On This Page
Item Attributes help Evergreen know how an item should behave. They include information related to the item's location and how it should circulate or fulfill holds.
Item attributes are the metadata attached to the copy record. They determine how the item behaves in Evergreen, and are used in conjunction with other data to determine where to find an item, how it will circulate, and if it is available to fulfill holds. Item Attributes are applied or edited in the Holdings Editor.
Any time you apply or change an attribute, the changed field will turn green.
To apply attributes:
- Click the attribute name.
- Perform the relevant action (click a radio button, select a list option, or open a pop-up box).
- Click Apply All & Save.
Note: You don't need to click Apply on each attribute you save. The Apply All & Save button will apply any edited attributes. However, fields will not turn green until you have clicked the individual apply buttons, so it may be helpful to click Apply each time you change an attribute.
Default Attributes
The following attributes are set by default when cataloging a new item. Any of them may be changed as needed. If they are not changed, they will be saved as part of the Item record.
- Status: In Process (some libraries may choose a different default)
- Shelving Location: Stacks (CARDINAL)
- Circulating Library: Matches your workstation's working location
- Owning Library: Matches your workstation's working location
- Can Circulate?: Yes
- Is Holdable?: Yes
- Loan Duration: Normal
- Fine Level: Normal
- OPAC Visible?: Yes
- Is Reference?: No
- Is Deposit Required?: No
- Deposit Amount: $0.00
- Price: $0.00
- Is Mint Condition: Good
Automatic Attributes
The follow attributes may not be set manually, but are set based on other input.
- Barcode: Created at the Holdings level and may be changed using the Replace Barcode feature.
- Creation Date: Set based on the time the holding is first created.
- Active Date: Set based on the time the Save button is clicked for the first time.
- Creator: Set based on the user who created the holding record.
- Last Edit Date: Set and re-set each time the Apply All & Save button is clicked.
- Last Editor: Set based on the user who makes changes to the Item Record.
3.6. Item Attribute Definitions
Item Attribute Definitions: Column by Column
On This Page
Attributes tell Evergreen how an item should behave, based on circulation and hold policies, and where an item should be shelved. Attributes are divided into columns based on categories.
Column 1: Attributes Related to Item Identification
The first column of Item Attributes helps to identify the item and track its history.
| Attribute | Definition | Editable? |
|---|---|---|
| Item Status | The item's current status. This may reflect the result of a transaction, and can be changed manually. However, it should never be changed from a status that would result in an indefinitely open transaction. | Yes, in most cases. |
| Barcode | This is a unique identifier that is set in the Holdings Editor along with the call number. | Can only be changed in the Holdings Editor, not the attributes field. |
| Creation Date | This is the date that the holding was first created for a library. This may be set as the result of an acquisitions order, Z39.50 import, MARC file upload, or manual holdings addition. | Set automatically and cannot be changed once set. |
| Active Date | This is set automatically when the Item Status is first changed from On Order or In Process to any other status. This may happen as the result of a manual status change or an item being checked-in and made Available. It does not always match the Creation Date. | Set automatically and cannot be changed once set. |
| Creator | This is the username of the staff account that a cataloger was logged into when the holdings record was created using any of the methods listed above. | Set automatically and cannot be changed once set. |
| Last Edit Date | This field is set for the first time when the the item record is saved. Re-set every subsequent time the record is saved. | Cannot be changed manually. |
| Last Editor | This is the username of the staff account that a cataloger was logged into when any aspect of the holdings record was changed and saved. Re-set every subsequent time the record is saved. | Cannot be changed manually. |
Column 2: Location Attributes
The attributes in Column 2 all provide data necessary for helping staff and patrons locate the book, both within an organizational structure and on the shelf.
| Attribute | Definition | Editable? |
|---|---|---|
| Shelving Location | Where the item can be found on the shelf in the library. Shelving Locations can influence the choice of circulation policy. | Yes. |
| Circulating Library | This is the library where the item is currenty shelved. It may not match the Owning Library. If Floating is activated, this field will update based on where the item is checked in. | Yes. |
| Owning Library | This is the library that owns the item. | Yes. |
| Item Number on Volume | If you have multiple copies and label them accordingly, those numbers will show up here. | Yes. |
| Call Number Label Classification | The classification scheme you set with the call number will be listed here. | Yes. |
| Call Number Prefix | A configurable code that is applied to the beginning of a call number. Any prefix that has been applied to the call number is listed here. | Yes. |
| Call Number Suffix | A configurable code that is applied to the end of a call number. Any suffix that has been applied to the call number is listed here. | Yes. |
Column 3: Circulation
| Attribute | Definition | Editable? |
|---|---|---|
| Can Circulate | "Yes" in this attribute will allow circulation if all other facets of a circulation policy will allow circulation. "No" in this attribute will stop all circulation regardless of potential policies. | Yes. |
| Is Holdable | "Yes" in this attribute means this item may be targeted to fulfill a hold if all other facets of a hold policy will allow it. "No" in this attribute will block this item from fulfilling a hold, regardless of potential policies. | Yes. |
| Age Hold Protection | If this is set, it works in conjunction with the Active Date to block external holds within a time frame of 3 months (all holds oustide the owning branch) or 6 months (all holds outside the owning system). Setting this attribute will not block external holds if the Active Date is outside the range of the attribute. | Yes. An automatic process will remove it after the age-hold protection period has ended, but staff can remove it manually prior to that date. |
| Floating Group | Selected libraries may be grouped together to allow items to "float" between them (see note below). These groups are created by administrators, and can be applied to items that should float. | Yes. |
| Loan Duration | Three options: Short, Normal, and Long. When an item is checked out, Evergreen selects a circulation policy to determine the loan duration. If that policy has Long or Short options, and the item has a Long or Short duration set in this attribute, those options in the selected circulation policy will be used. If the selected policy does not have alternative duration options, the Normal policy will be used regardless of this attribute's setting. | Yes. |
| Fine Level | Three options: Low, Normal, and High. When an item is checked out, Evergreen selects a circulation policy to determine the rate of fines. If that policy has Low or High options, and the item has a Low or High fine level set in this attribute, those options in the selected circulation policy will be used. If the selected policy does not have alternative fine levels, the Normal policy will be used regardless of this attribute's setting. | Yes. |
| Circulation Type | Circulation Policies may utilize the Circulation Type as assigned in the MARC record to add further nuance to selection parameters (this is rare). If your library has such a policy, you can add the correct type to items using this attribute. Doing so does not change the metadata stored in the MARC record. | Yes. |
| Circulation Modifier | One of the most common details to impact circulation policy and hold policy selections. This attribute is required when saving an item record. | Yes. |
| OPAC Visible | Determines if an item will be visible to patrons when searching the public catalog. If the shelving location or owning library has been set to OPAC Invisible, that setting will override this attribute. | Yes. |
| Is Reference | Sets the item to reference, regardless of shelving location or call number. This blocks circulation and holds. | Yes. |
Note: Items set to float will be shelved at the library where they are checked in, as long as that library is included in the designated floating group. Items circulated through resource sharing will not be shelved at the circulating library upon return. If not on hold for another user, they will be returned to the owning system.
Cost and Condition
Attributes in this column may impact transactions in Evergreen by assigning pre-determined costs at circulation (for items requiring a deposit) or in the event of loss of damage.
| Attribute | Definition | Editable? |
|---|---|---|
| Is Deposit Required? | "Yes" in this attribute will trigger a charge for the amount listed in the Deposit Amount attribute. "No" in this column will not trigger a charge even if an amount is listed. | Yes. |
| Deposit Amount | The amount in this attribute will be charged to the patron's account upon checkout only if Is Deposit Required is set to "Yes." | Yes. |
| Price | This should be set to the amount you will charge a patron to replace this item. That may reflect the list price of the item, the amount you actually paid for the item, or a standard amount determined by your library. Holdings imported via the MARC Batch Upload with a price included in the holding profile will populate that price in this field. | Yes. |
| Cost | This may be set to the amount you paid for the item. The amount listed in this field will not be considered when chaging replacement fees. Libraries using Evergreen Acquisitions may have this attribute auto-populated based on prices listed in purchase orders. | Yes. |
| Is Mint Condition | This Attribute may be set to Good or Damaged. Items with this field set to Damaged may not be considered to fulfill holds with condition requirements attached to the request. Setting this Attribute to Damaged will not charge patrons or change the item's status. | Yes. |
Alets, Notes, Tags, Statistics
This column includes Attributes focused on adding additional information to items that may direct staff during transactions or create extra metadata for reporting purposes. For more details about how and when to add these data points, please see the [link to chapeter].
| Attribute | Definition | Editable? |
|---|---|---|
| Alerts | Customized alert messages that appear when a designated action is taken against an item (such as checking out). Items may have multiple alerts. Staff can add new alerts or edit and delete existing alerts. | Yes. |
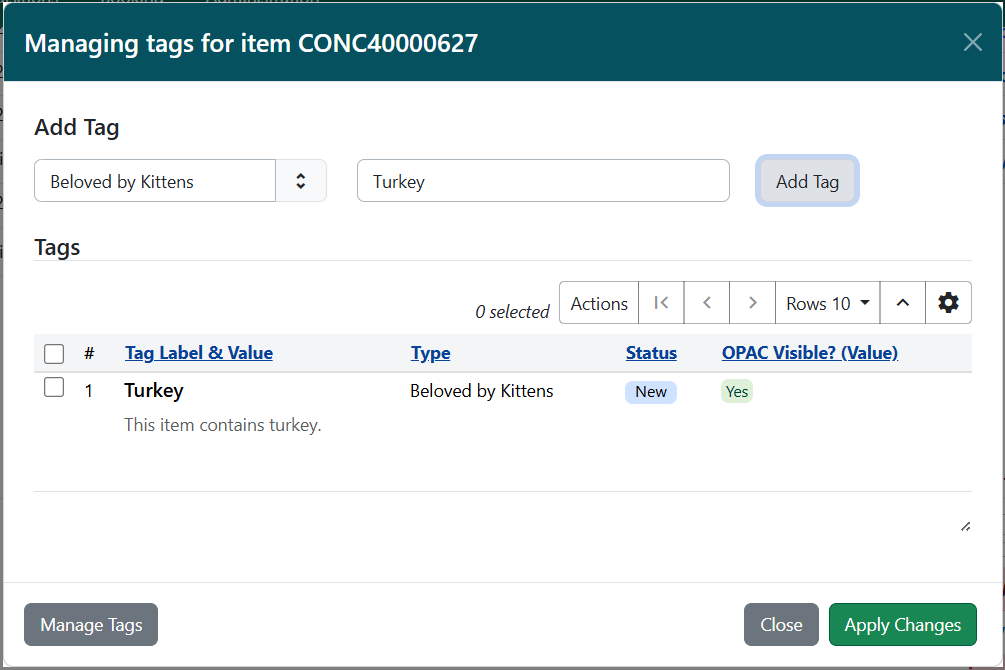
| Tags | Customized messages visible in the public catalog and are searchable in both the staff client and public catalog based on configuration. They require two parts: a type and a value. Types must be configured by admin, and are currently limited to Digital Bookplates. | Yes. |
| Notes | Item notes are free text fields that include a note title, note content, and checkbox to indicate whether a note is public. Public notes are visible in the OPAC, but not searchable. | Yes. |
| Floating Group | Selected libraries may be grouped together to allow items to "float" between them (see note below). These groups are created by administrators, and can be applied to items that should float. | Yes. |
| Loan Duration | Three options: Short, Normal, and Long. When an item is checked out, Evergreen selects a circulation policy to determine the loan duration. If that policy has Long or Short options, and the item has a Long or Short duration set in this attribute, those options in the selected circulation policy will be used. If the selected policy does not have alternative duration options, the Normal policy will be used regardless of this attribute's setting. | Yes. |
| Fine Level | Three options: Low, Normal, and High. When an item is checked out, Evergreen selects a circulation policy to determine the rate of fines. If that policy has Low or High options, and the item has a Low or High fine level set in this attribute, those options in the selected circulation policy will be used. If the selected policy does not have alternative fine levels, the Normal policy will be used regardless of this attribute's setting. | Yes. |
3.7. Circulation Modifiers
Adding Circulation Modifiers
On This Page
Circulation Modifiers are item type designators added at the local item level (not included in the bibliographic Record) that impact how an item circulates. Catalogers select them when adding Item Attributes from a designated list of options.
Circulation modifiers are an important factor for building circulation and hold policies. They are added at the Item level as Item Attributes in the Holdings Editor.
While it is advisable to apply circulation modifiers that match the item type, in some cases, a library's selection of circulation policies may dictate specific policies that don't match exactly (for example, PLAYAWAY versus AUDIOBOOK).
How are Circulation Modifiers Chosen?
The consortium moderates the list of available Circulation Modifiers to limit complexity while ensuring that libraries have sufficient options for circulation and hold policies. This results in a large but finite list of options. Any request to add new circulation modifiers should be sent to Cardinal staff and will be discussed in the Cataloging Interest Group.
Adding Circulation Modifiers
Circulation modifiers appear in the dropdown list in Item Attributes section of the Holdings Editor. They are a required field and must be applied for every item in the catalog.
| NC Cardinal Circulation Modifiers |
| ART PRINT |
| AUDIOBOOK |
| BOOK |
| DOCUMENT |
| EBOOK |
| EQUIPMENT |
| GAME |
| HOTSPOT |
| ILL |
| KIT |
| LAPTOP |
| MAGAZINE |
| MAP |
| MICROFORM |
| MISC |
| MUSIC |
| NEWSPAPER |
| PERIODICAL |
| PLAYAWAY |
| RENTAL |
| SOFTWARE |
| TECHNOLOGY |
| VERTICAL FILE |
| VIDEO |
Note: When importing records in the Batch Importer, the Holdings Profile includes a subfield for Circ Modifier. This field must use the exact format, spelling, and capitalization listed above or the upload will fail.
Resource Sharing
NC Cardinal has hold policies that allow all items with BOOK, AUDIOBOOK, VIDEO & MUSIC circulation modifiers to be available for resource sharing, unless the shelving location or item prevents holds (such as reference or genealogy items.)
By default, Cardinal-wide hold policies are set up for all the other circ mods so holds cannot be placed on them, unless your library system has requested a hold policy to allow your patrons to place holds on items with those circ mods. By default, hold policies for these non-resource sharing circulation modifiers will be set so that holds can be placed only by your patrons, unless you specify that you want those items to be eligible for resource sharing.
3.8. Shelving Locations
What are Shelving Locations?
On This Page
Shelving Locations serve two purposes in Evergreen: they are part of the indicator of a resource's physical location in the library and they help determine how an item will circulate. Shelving Locations are applied at the item level, in teh Holdings Editor. Different librarues may apply different shelving locations to the same title, even when they share a bibliographic Record.
Shelving locations are important indicators to help patrons find items in the library and may be used for circulation policies. A shelving location must be applied to every item in the catalog.
These shelving locations are "owned" at the consortium level and should be used as much as possible. In order to help Evergreen run more efficiently and minimize the number of shelving locations that appear in circulation reports, the consortium consolidated shelving locations in NC Cardinal and continues to encourage libraries to use existing shelving locations, rather than requesting additional ones. Each additional shelving location for circulating materials impacts every library's circulation reports, as the more shelving locations there are (even at the system level), the more lines show up in monthly circulation reports and annual Public Library Survey data collection.
System level shelving locations may be added for substantial collections if absolutely necessary for correct circulation or for patrons to find materials in the library. However, most small collections do not need their own shelving location. Particularly when smaller subsets of items are shelved within the same area of the library as a larger 'umbrella' collection of similar material, the recommended practice is to use the 'umbrella' shelving location to get patrons to the right section of the library and then use call number/prefix/suffix options, signage, shelf tags/labels, and spine stickers to point the patron to any smaller groups within the larger collection.
When selecting a shelving location, it is important to pay attention to the settings for Holdable, OPAC Visible, and Circulate:
- Holdable=YES means the items assigned to that shelving location are holdable based on applicable hold policies, unless the item record is marked Holdable=False or the item has an item status that is Holdable=False.
- Holdable=NO means the items assigned to the shelving location will never be holdable, regardless of other settings, although staff can override in some situations.
- OPAC Visible=YES means that the items are visible to patrons in the OPAC, unless the items are in an item status that is OPAC visible=False.
- OPAC Visible=NO means the items assigned to the shelving location will never be visible to patrons in the OPAC.
- Circulate=YES means that items assigned to that shelving location are eligible to circulate based on applicable circulation policies, unless the item record is marked Circulate=False. For items in an item status where Is Available=False, staff will see a pop-up message on the checkout screen indicating the non-standard status.
- Circulate=NO means the items assigned to the shelving location will never circulate, unless staff choose to override.
| SHELVING LOCATION | HOLDABLE | OPAC VISIBLE | CIRCULATE |
| Adult Audiobook | Yes | Yes | Yes |
| Adult Audiobook Fiction | Yes | Yes | Yes |
| Adult Audiobook Nonfiction | Yes | Yes | Yes |
| Adult Biography | Yes | Yes | Yes |
| Adult Biography Oversize | Yes | Yes | Yes |
| Adult Fiction | Yes | Yes | Yes |
| Adult Fiction Battle of the Book | Yes | Yes | Yes |
| Adult Fiction Christian | Yes | Yes | Yes |
| Adult Fiction Classics | Yes | Yes | Yes |
| Adult Fiction Display | Yes | Yes | Yes |
| Adult Fiction Holiday | Yes | Yes | Yes |
| Adult Fiction Inspiration | Yes | Yes | Yes |
| Adult Fiction Mystery | Yes | Yes | Yes |
| Adult Fiction Outreach | No | No | Yes |
| Adult Fiction Oversize | Yes | Yes | Yes |
| Adult Fiction Paperback | Yes | Yes | Yes |
| Adult Fiction Romance | Yes | Yes | Yes |
| Adult Fiction Science Fiction | Yes | Yes | Yes |
| Adult Fiction Series | Yes | Yes | Yes |
| Adult Fiction Short Story | Yes | Yes | Yes |
| Adult Fiction Urban | Yes | Yes | Yes |
| Adult Fiction Western | Yes | Yes | Yes |
| Adult Foreign Language Audiobook | Yes | Yes | Yes |
| Adult Foreign Language Fiction | Yes | Yes | Yes |
| Adult Foreign Language Nonfiction | Yes | Yes | Yes |
| Adult Foreign Language Reference | No | Yes | No |
| Adult Foreign Language Video | Yes | Yes | Yes |
| Adult Government Documents | Yes | Yes | Yes |
| Adult Graphic Novel | Yes | Yes | Yes |
| Adult Kit | Yes | Yes | Yes |
| Adult Large Print Biography | Yes | Yes | Yes |
| Adult Large Print Fiction | Yes | Yes | Yes |
| Adult Large Print Fiction Outreach | No | No | Yes |
| Adult Large Print Fiction Paperback | Yes | Yes | Yes |
| Adult Large Print Fiction Short Story | Yes | Yes | Yes |
| Adult Large Print Mystery | Yes | Yes | Yes |
| Adult Large Print New Fiction | Yes | Yes | Yes |
| Adult Large Print New Nonfiction | Yes | Yes | Yes |
| Adult Large Print Nonfiction | Yes | Yes | Yes |
| Adult Large Print Nonfiction Paperback | Yes | Yes | Yes |
| Adult Large Print Western | Yes | Yes | Yes |
| Adult Literacy | Yes | Yes | Yes |
| Adult Local Author | Yes | Yes | Yes |
| Adult Magazine | Yes | Yes | Yes |
| Adult Magazine Outreach | No | No | Yes |
| Adult Music | Yes | Yes | Yes |
| Adult New Audiobook | Yes | Yes | Yes |
| Adult New Biography | Yes | Yes | Yes |
| Adult New Fiction | Yes | Yes | Yes |
| Adult New Magazine | No | Yes | No |
| Adult New Music | Yes | Yes | Yes |
| Adult New NC Nonfiction | Yes | Yes | Yes |
| Adult New Nonfiction | Yes | Yes | Yes |
| Adult New Video | Yes | Yes | Yes |
| Adult Nonfiction | Yes | Yes | Yes |
| Adult Nonfiction Display | Yes | Yes | Yes |
| Adult Nonfiction Holiday | Yes | Yes | Yes |
| Adult Nonfiction NC Biography | Yes | Yes | Yes |
| Adult Nonfiction NC Collection | Yes | Yes | Yes |
| Adult Nonfiction NC History | Yes | Yes | Yes |
| Adult Nonfiction Outreach | No | No | Yes |
| Adult Nonfiction Oversize | Yes | Yes | Yes |
| Adult Nonfiction Paperback | Yes | Yes | Yes |
| Adult Nonfiction Parenting | Yes | Yes | Yes |
| Adult Nonfiction Spanish | Yes | Yes | Yes |
| Adult Reference | No | Yes | No |
| Adult Reference Oversize | No | Yes | No |
| Adult Storage Fiction | Yes | Yes | Yes |
| Adult Storage Nonfiction | Yes | Yes | Yes |
| Adult Storage Video | Yes | Yes | Yes |
| Adult Video | Yes | Yes | Yes |
| Adult Video Fiction | Yes | Yes | Yes |
| Adult Video Nonfiction | Yes | Yes | Yes |
| Adult Video R | Yes | Yes | Yes |
| Cabinet | No | Yes | No |
| Desk- Childrens | No | Yes | Yes |
| Desk- Circulation | No | Yes | Yes |
| Desk- Information | No | Yes | Yes |
| Desk- Reference | No | Yes | No |
| Desk- Technology | No | Yes | Yes |
| Desk- Young Adult | No | Yes | Yes |
| Easy Audio Enabled Books | Yes | Yes | Yes |
| Easy Boardbook | Yes | Yes | Yes |
| Easy Caldecott | Yes | Yes | Yes |
| Easy Fiction | Yes | Yes | Yes |
| Easy Foreign Language | Yes | Yes | Yes |
| Easy Holiday | Yes | Yes | Yes |
| Easy New Fiction | Yes | Yes | Yes |
| Easy New Nonfiction | Yes | Yes | Yes |
| Easy Nonfiction | Yes | Yes | Yes |
| Easy Outreach | No | No | Yes |
| Easy Paperback | Yes | Yes | Yes |
| Easy Reader | Yes | Yes | Yes |
| Equipment | Yes | Yes | Yes |
| Games | Yes | Yes | Yes |
| Genealogy | No | Yes | No |
| Homeschool Collection | Yes | Yes | Yes |
| Juvenile Audio Enabled Books | Yes | Yes | Yes |
| Juvenile Audiobook | Yes | Yes | Yes |
| Juvenile Biography | Yes | Yes | Yes |
| Juvenile Boardbook | Yes | Yes | Yes |
| Juvenile Fiction | Yes | Yes | Yes |
| Juvenile Fiction Battle of the Book | Yes | Yes | Yes |
| Juvenile Fiction Display | Yes | Yes | Yes |
| Juvenile Fiction Holiday | Yes | Yes | Yes |
| Juvenile Fiction Outreach | No | No | Yes |
| Juvenile Fiction Oversize | Yes | Yes | Yes |
| Juvenile Fiction Paperback | Yes | Yes | Yes |
| Juvenile Fiction Series | Yes | Yes | Yes |
| Juvenile Foreign Language Audiobook | Yes | Yes | Yes |
| Juvenile Foreign Language Biography | Yes | Yes | Yes |
| Juvenile Foreign Language Fiction | Yes | Yes | Yes |
| Juvenile Foreign Language Fiction Paperback | Yes | Yes | Yes |
| Juvenile Foreign Language Nonfiction | Yes | Yes | Yes |
| Juvenile Foreign Language Video | Yes | Yes | Yes |
| Juvenile Graphic Novel | Yes | Yes | Yes |
| Juvenile Kit | Yes | Yes | Yes |
| Juvenile Local Author | Yes | Yes | Yes |
| Juvenile Magazine | Yes | Yes | Yes |
| Juvenile Music | Yes | Yes | Yes |
| Juvenile New Fiction | Yes | Yes | Yes |
| Juvenile New Nonfiction | Yes | Yes | Yes |
| Juvenile New Video | Yes | Yes | Yes |
| Juvenile Newbery | Yes | Yes | Yes |
| Juvenile Nonfiction | Yes | Yes | Yes |
| Juvenile Nonfiction Battle of the Book | Yes | Yes | Yes |
| Juvenile Nonfiction Display | Yes | Yes | Yes |
| Juvenile Nonfiction Holiday | Yes | Yes | Yes |
| Juvenile Nonfiction Outreach | No | No | Yes |
| Juvenile Nonfiction Oversize | Yes | Yes | Yes |
| Juvenile Nonfiction Series | Yes | Yes | Yes |
| Juvenile Parent Teacher | Yes | Yes | Yes |
| Juvenile Reader | Yes | Yes | Yes |
| Juvenile Reference | No | Yes | No |
| Juvenile Storage Fiction | Yes | Yes | Yes |
| Juvenile Storage Nonfiction | Yes | Yes | Yes |
| Juvenile Storage Video | Yes | Yes | Yes |
| Juvenile Storytime | No | No | No |
| Juvenile Video | Yes | Yes | Yes |
| Library of Things | Yes | Yes | Yes |
| Local History Nonfiction | Yes | Yes | Yes |
| Local History Reference | No | Yes | No |
| Lucky Day Display | No | Yes | Yes |
| Nontraditional Collection | No | Yes | Yes |
| North Carolina Room | No | Yes | Yes |
| North Carolina Room Adult Reference | No | Yes | No |
| Office | No | No | No |
| Office Childrens | No | No | No |
| On Order | Yes | Yes | Yes |
| Pamphlets | Yes | Yes | Yes |
| Professional Nonfiction Collection | No | Yes | No |
| Public Computer | No | Yes | Yes |
| Software | Yes | Yes | Yes |
| Stacks | No | Yes | Yes |
| Storage | Yes | Yes | Yes |
| Teacher Nonfiction Resource | Yes | Yes | Yes |
| Young Adult Audio Enabled Books | Yes | Yes | Yes |
| Young Adult Audiobook | Yes | Yes | Yes |
| Young Adult Biography | Yes | Yes | Yes |
| Young Adult Fiction | Yes | Yes | Yes |
| Young Adult Fiction Battle of the Book | Yes | Yes | Yes |
| Young Adult Fiction Display | Yes | Yes | Yes |
| Young Adult Fiction Paperback | Yes | Yes | Yes |
| Young Adult Fiction School Reader | Yes | Yes | Yes |
| Young Adult Fiction Series | Yes | Yes | Yes |
| Young Adult Foreign Language Fiction | Yes | Yes | Yes |
| Young Adult Foreign Language Fiction Paperback | Yes | Yes | Yes |
| Young Adult Foreign Language Nonfiction | Yes | Yes | Yes |
| Young Adult Graphic Novel | Yes | Yes | Yes |
| Young Adult Kit | Yes | Yes | Yes |
| Young Adult Magazine | Yes | Yes | Yes |
| Young Adult Music | Yes | Yes | Yes |
| Young Adult New Fiction | Yes | Yes | Yes |
| Young Adult New Fiction Paperback | Yes | Yes | Yes |
| Young Adult New Nonfiction | Yes | Yes | Yes |
| Young Adult Nonfiction | Yes | Yes | Yes |
| Young Adult Nonfiction Battle of the Book | Yes | Yes | Yes |
| Young Adult Nonfiction Display | Yes | Yes | Yes |
| Young Adult Nonfiction Oversize | Yes | Yes | Yes |
| Young Adult Nonfiction Paperback | Yes | Yes | Yes |
| Young Adult Reference | No | Yes | No |
| Young Adult Storage Fiction | Yes | Yes | Yes |
| Young Adult Storage Nonfiction | Yes | Yes | Yes |
| Young Adult Video | Yes | Yes | Yes |
Structure of a Shelving Location Name
In 2017 NC Cardinal went through a shelving location consolidation and came up with our naming conventions for shelving locations. We generally follow this format.
- (Audience) Adult, Juvenile, Young Adult, Easy, Professional
- Foreign Language, Large Print
- New, Storage
- Fiction, Nonfiction
- NC, Local History
- (All the other qualifiers) Audiobook, Battle of the Book, Biography, Boardbook, Caldecott, Christian, Display, Government Documents, Graphic Novel, History, Holiday, Kit, Magazine, Music, Mystery, Outreach, Oversize, Paperback, Reader, Reference, Romance , Science Fiction, Series, Short Story, Spanish, Video, Video R, Western
Video should be used rather than DVD or Blu-ray
Note for catalogers: Holdings tags for batch import must use the exact format, spelling, and capitalization shown.
3.9. Item Statuses in Evergreen
List of Item Statuses in Evergreen
On This Page
Item statuses may be applied manually in the Holdings Editor, or as the result of a specific action in Evergreen. An Item's status may affect how the item circulates, and if it may be targeted to fulfil a hold. Information about each status is available on this page, including how the status affects the item's behavior.
| Status | Available | Holdable | OPAC Visible | Active | Restrict Delete | Prone Hopeless | ID |
| At Children's Desk | FALSE | TRUE | TRUE | TRUE | FALSE | FALSE | 107 |
| At Circulation Desk | FALSE | TRUE | TRUE | FALSE | FALSE | FALSE | 108 |
| Available | TRUE | TRUE | TRUE | TRUE | FALSE | FALSE | 0 |
| Bindery | FALSE | FALSE | FALSE | FALSE | FALSE | FALSE | 2 |
| Canceled Transit | FALSE | TRUE | TRUE | FALSE | FALSE | FALSE | 18 |
| Cataloging | FALSE | FALSE | FALSE | FALSE | FALSE | FALSE | 11 |
| Checked out | FALSE | TRUE | TRUE | TRUE | TRUE | FALSE | 1 |
| Claimed Lost | FALSE | FALSE | FALSE | FALSE | FALSE | TRUE | 102 |
| Claimed Returned | FALSE | FALSE | FALSE | FALSE | FALSE | TRUE | 136 |
| Damaged | FALSE | FALSE | FALSE | FALSE | FALSE | TRUE | 14 |
| Digitization in Process | FALSE | FALSE | FALSE | FALSE | FALSE | FALSE | 134 |
| Discard/Weed | FALSE | FALSE | FALSE | FALSE | FALSE | TRUE | 13 |
| ILL | FALSE | FALSE | FALSE | TRUE | FALSE | TRUE | 10 |
| In process | FALSE | TRUE | TRUE | FALSE | FALSE | FALSE | 5 |
| In transit | FALSE | TRUE | TRUE | FALSE | TRUE | FALSE | 6 |
| In Use for Programs | FALSE | FALSE | TRUE | FALSE | FALSE | FALSE | 109 |
| Long Overdue | FALSE | FALSE | FALSE | FALSE | TRUE | TRUE | 16 |
| Lost | FALSE | FALSE | FALSE | FALSE | TRUE | TRUE | 3 |
| Lost and Paid | FALSE | FALSE | FALSE | FALSE | TRUE | TRUE | 17 |
| Missing | FALSE | FALSE | FALSE | FALSE | FALSE | TRUE | 4 |
| Natural Disaster | FALSE | FALSE | FALSE | FALSE | FALSE | TRUE | 137 |
| Never Returned | FALSE | FALSE | FALSE | FALSE | FALSE | TRUE | 101 |
| Noncirculating | FALSE | FALSE | TRUE | FALSE | FALSE | TRUE | 110 |
| On Display | FALSE | TRUE | TRUE | TRUE | FALSE | FALSE | 104 |
| On holds shelf | FALSE | TRUE | TRUE | TRUE | TRUE | FALSE | 8 |
| On order | FALSE | TRUE | TRUE | FALSE | FALSE | FALSE | 9 |
| On reservation shelf | FALSE | FALSE | FALSE | TRUE | FALSE | FALSE | 15 |
| Quarantine | FALSE | FALSE | FALSE | FALSE | FALSE | FALSE | 135 |
| Relocating | FALSE | TRUE | TRUE | FALSE | FALSE | FALSE | 105 |
| Repair | FALSE | FALSE | TRUE | FALSE | FALSE | TRUE | 106 |
| Reserves | FALSE | FALSE | TRUE | TRUE | FALSE | FALSE | 12 |
| Reshelving | TRUE | TRUE | TRUE | TRUE | FALSE | FALSE | 7 |
| Storage | FALSE | FALSE | TRUE | FALSE | FALSE | FALSE | 103 |
Last Update 11/08/2024
3.10. Item Attribute Templates
Create and Apply Item Templates
On This Page
Catalogers can use templates to apply consistent item attributes for different types of materials. Templates may be exported and imported, allowing staff across a library to share the same templates.
Use of templates enhances item creation and helps ensure consistency in record format in the database. If you wish to create reusable cataloging templates to save time while cataloging similar items, go to the Administration tab in the Holdings Editor.
Note: Item templates are unique to the login account of the creator and can only be shared if exported by the creator and then imported and saved by another user.
Create a New Item Template
- Search for and retrieve a bibliographic record matching the resource you wish to catalog.
- Open the Holdings Editor.
- Go to the Administration tab.
- Click Create Template.
- Add all the criteria needed for the item template (so that the edited fields turn green).
- Enter a unique name for the item template.
- Click the Save as New Template button.
- The newly created template will appear in the grid, and may now be selected from the drop down menu when cataloging items.
Note: Circulate=yes, Holdable=Yes, OPAC visible=Yes, Reference=No, Item Status=In process, Quality=Good, Deposit=No, Fine Level=Normal and Loan Duration=Normal are all default values and do not need to be set in an item template, unless the value should be different than the default. Catalogers must always select values for Circulation Modifier and Shelving Location and can add 6-month Age-based Hold Protection, if desired.
Apply Item Template
- Open the Holdings Editor for the item(s) to apply a template to.
- Choose the appropriate template from the drop down menu.
- Click Apply Template.
- Make edits as necessary (such as adding price, etc.).
- When finished, click Apply All, Save & Exit.
Export Item Templates
- Choose one template in the grid, then click the Export button on the top right side of the Item Templates tab in the Holdings Editor.
- Select where the template should be saved on the workstation, name the file, and click Save.
- Click OK.
Import Item Templates
- Click the Import button on the top right side of the Item Templates tab in the Holdings Editor. This will import all templates for the user.
- Navigate to the file’s location, select the file and click Open.
- Click OK.
4. Selecting Matching Bib Record
4.1. Matching Record Basics
How, Why, and When to Match Records
On This Page
NC Cardinal's shared catalog policies require that items with matching content share bibliographic records. Catalogers should avoid adding new records if an existing one is available. When selecting a bibliographic record, prioritize the most accurate MARC record, considering ISBN, title, author, edition, publisher, publication date, and format.
NC Cardinal's shared catalog contains millions of items. In order to keep the catalog streamlined, and make the process of finding materials and requesting holds as patron-friendly as possible, NC Cardinal requires that items with matching content share bibliographic records. If a matching bibliographic record already exists within NC Cardinal, catalogers should not add or import a new or additional record.
NOTE: You should combine print books on the same bibliographic record, in spite of differences in ISBN, publisher, dimensions, and pagination, when the content is exactly the same.
Selecting a Matching Bibliographic Record
You may find that you have several choices when matching a resource with the appropriate catalog record (or that you have only a few that may not actually match).
If several title records appear to be for the same item:
- Add your holdings to the most accurate and complete MARC record.
- If two or more MARC records are equal in quality, select the record that has the most copies.
- When in doubt, refer the records to a Bibliographic Cataloger.
Finding the Best Record
When choosing the right record for your resource, the following information must be closely examined:
- ISBN (020 field) or other ID numbers (024, 028)
- Title information (245 $a, $b)
- Author (245 $c — also 1XX, 7XX, 511, 508)
- Edition statement (250)
- Publisher (264 _1 $b)
- Date of publication (264 _1 $c) and/or Copyright date (264 _4 $c)
- Print size (i.e. Large print vs. regular print)
- Right number of discs (A/V) — 300
- UPC (A/V) — 024
Format
Look at the format icons displayed in the catalog when examining potential matches. Verify that a format icon appears in the catalog and matches the information in the bibliographic record. If not, please refer the record to a bibliographic cataloger. See Use of Single Bib Record for Books for additional information about when to combine records.
Physical materials (books, audiobooks, videos, etc.) should never be attached to e-resource records — such as e-book or e-audiobook formats. Some bibliographic records for print resources may contain 856 links to digital (pdf or online) copies of the print resource. These are not considered to be e-book records, as they do not require patron authentication and are accessible to anyone with the link (whether or not they are a library patron). Such digital copy links should be retained in the bib record for the physical material.
You should also pay attention to any discrepancies in statements of responsibility, subtitle, narrator (for audiobooks), director/producer/actors (for videos), table of contents, or other notes. These differences and/or any significant differences in the MARC fields are an indication that you may have a non-matching resource.
Notify a Bibliographic Cataloger:
- If a record seems to include any problems or inaccuracies
- If a record is missing fixed fields
- If a record includes 856 links that are not for the resource (i.e. table of contents, cover image, etc.)
- If a record does not include any subject headings (6XX fields) or has repetitive subject headings
- If there seem to be multiple matching records for the exact same item
- If a record has the name of a series in the title field (245 $a)
- If the record is accompanied by an incorrect icon or is missing an icon (It’s a DVD with a Blu-ray icon)
4.2. Matching Specialized Materials: Graphic Novels & Manga
Finding Matching Bib Records for Graphic Novels & Manga
On This Page
Graphic novels are cataloged as monograph series, with each book having a separate bibliographic record. When matching records, look for the 245 field, which must include the title of the individual resource, specifying the part/section number with $n and the title with $p. Series statements appear in the 490 and 8XX fields and should match the item in hand. Proper subject and genre headings are required, and can be used to further ensure a correct match.
Graphic novels should be cataloged as a monograph series and not as a monograph set (see Multi-volume or Multi-part Sets) [LINK].
Titles and 245 fields
Each book should be cataloged on a separate bibliographic record as an independent resource with the title of the individual resource in the 245 field.
- The 245 $n should have the number of the part/section following the nomenclature used for monographic parts
- The 245 $p should have the title of the part/section.
- You can also optionally include the value in the 245 $p in the 246.
- To be searchable, the series statement(s) must appear in the appropriate 490 and 8XX fields.
- The 245 should reflect what is on the resource. For example, if the book says “vol.” then this should be transcribed as so in the bib record.
Examples of 245 $n $p for graphic novels
=245 10$aJustice League.$nVolume 7,$pGalaxy of terrors
=245 10$aDaredevil.$nVol. 5,$pTruth/dare
=245 10$aHilo.$nBook 5,$pThen everything went wrong
=245 10$aMy hero academia.$n Vol. 9,$pMy hero
Note for Manga Print Format
Because of the nature of manga's print format, it is recommended that a 500 note be included in the record that specifies that the work is read from right to left, rather than left to right. The following example may be used for reference:
=500 \\$aManga - reads from right to left.
Age Level
It is recommended that the age level or rating for a manga or graphic novel be included in the record using the 521 field. The age level or rating can usually be found on the front or back cover of the work, but if not, you may be able to find this information on the publisher's website, NoveList Plus, your book vendor's website, etc. If the rating comes from a source other than the work itself, use subfield $b to list the source info.
Examples
=521 8\$aRated: Mature.
=521 8\$aTarget age group: 08 to 12.$bIngram Content Group.
Graphic Novels vs. Text Books
To distinguish the graphic novel from the standard book version, catalogers may want to include a 250 edition statement to indicate the bib is for the graphic novel, especially when ‘the graphic novel’ is not included as a subtitle on the resource (therefore, cannot be included in the 245 $b).
Graphic novels and manga bibliographic records should always include the appropriate subject and genre headings. (See Subject and Genre/Form Headings.)
Examples
=650 \0$aManga (comic books)
=655 \7$aManga.$2lcgft
=655 \7$aGraphic novels.$2lcgft
=655 \7$aYoung adult fiction.$2lcsh
=655 \7$aYoung adult literature.$2lcsh
Fields and Subfields
Because the value "c" for the LitF ("Literary form") fixed field is obsolete, and because there can be both fiction and nonfiction graphic novels and comic works, only the values "0" and "1" should be used in the LitF fixed field for graphic novels and manga, as illustrated below.
“Fiction” comic works
008 fields
- “Contents” 6 (comics/graphic novels)
- “Literary form” 1 (Fiction works)
6XX fields
- All subject headings should have $v Comic books, strips, etc.
- For juvenile books, add a subject heading with $v Juvenile fiction. (Because subfield $v is repeatable, $v Juvenile fiction can simply be added after $v Comic books, strips, etc. instead of having two separate subject headings.)
- Example 1 (juvenile graphic novel)
- 650 _0 $a Cowboys $v Comic books, strips, etc. $v Juvenile fiction.
- 650 _0 $a Horses $v Comic books, strips, etc. $v Juvenile fiction.
- Example 2 (adult graphic novel)
- 650 _0 $a Cowboys $v Comic books, strips, etc.
- 650 _0 $a Horses $v Comic books, strips, etc.
- 655 fields (genre/form headings)
- 655 _7 $a Graphic novels. $2 lcgft
- 655 _7 $a Comics (Graphic works) $2 lcgft
“Nonfiction” comic works
008 fields
- “Contents” 6 (Comics/graphic novels)
- “Literary form” 0 (Nonfiction works)
6xx fields
- All subject headings should have $v Comic books, strips, etc.
- For juvenile works, add a subject heading with $v Juvenile literature. (Because subfield $v is repeatable, $v Juvenile literature can simply be added after $v Comic books, strips, etc. instead of having two separate subject headings.)
- Example 1 (juvenile nonfiction comics)
- 600 10 $a King, Martin Luther, $c Jr., $d 1929-1968 $v Comic books, strips, etc. $v Juvenile literature.
- 650 _0 $a Civil rights workers $z United States $v Biography $v Comic books, strips, etc. $v Juvenile literature.
- Example 2 (adult nonfiction comics)
- 600 10 $a King, Martin Luther, $c Jr., $d 1929-1968 $v Comic books, strips, etc.
- 650 _0 $a Civil rights workers $z United States $v Biography $v Comic books, strips, etc.
- 655 fields (genre/form headings)
- 655 _7 $a Graphic novels. $2 lcgft
- 655 _7 $a Comics (Graphic works) $2 lcgft
4.3. Matching Specialized Materials: Multi-Volume & Multi-Part Sets
Single, Set, Series, or Serial?
On This Page
An overview of the different types of multi-part records: Monograph Sets, Series, and Serials.
Sometimes it can be challenging to sort out whether connected resources need to be cataloged on the same or separate bibliographic records and whether they should be cataloged as monograph parts or volumes.
Monograph
A resource consisting of a single volume. Monographs with the same content and format should almost always be cataloged on a single bib record.
Example: a book or movie on DVD.
Monograph Set
A resource consisting of multiple volumes with a pre-determined ending volume/date. These should be cataloged on one bibliographic record using the Monograph Parts feature in Evergreen.
Example: Set of encyclopedias, a television series on DVD.
Series
Independent monographs often tied together by some element like subject, author, publisher, etc., and often published on an ongoing (regular or irregular) basis. While they may have a collective title, these should be cataloged on separate records with only the title of the individual resource (not the series title) in the 245 field. Do NOT add series information in the 245. To be searchable, the series statement(s) must appear in the appropriate 490 and 8XX fields.
Example: Magic Tree House series by Mary Pope Osborne or A Song of Ice and Fire (Game of Thrones) series by George R. R. Martin.
Serial
A resource consisting of multiple volumes, which are released over time, usually at regular intervals, with no set end date. These should be cataloged as volumes on one serial record.
Example: Our State magazine.
NOTE: Graphic novels should be cataloged as a series and not as a monograph (multi-volume) set. Each book should be cataloged on a separate bib record as an independent resource.
4.4. Matching Specialized Materials: Juvenile & Young Adult
Finding Matching Bib Records for Juvenile & Young Adult Materials
On This Page
When evaluating records for juvenile and YA material, it's important to look for specific metadata in the MARC record that designates the material as juvenile or YA. Furthermore, indications that a title is specifically for a board book must be identified before attaching a board book to an existing record.
When evaluating bibliographic records for juvenile and young adult materials, catalogers should follow the same guidelines for matching adult materials to the correct records. However, to ensure the items being cataloged are true matches, especially for differently formatted materials such as board books, there are some additional criteria in the MARC record to review. This is especially important when cataloging board books, which must be attached to specific records for that format. Do not attach board books to paper picture book records and vice versa.
"Audn" Code
In the =008 fixed field, the Audn (for "Audience") code defines the target audience of the work.
- For juvenile materials, look for code j for "Juvenile."
- For young adult materials, look for code d for "Adolescent."
Records for Board Books
=245 Subfield $h
When evaluating a record for a board book, it must include the GMD $h[board book] in the =245 title field. When looking for a board book record, if all other parts of the record match, but the GMD $h is not present, do not attach a board book to the record.
For example:
=245 14$aThe very hungry caterpillar$h[board book] /$cby Eric Carle.
Corresponding =250 Field
When evaluating a record for a board book, in addition to the GMD, you may also see the following =250 edition statement:
=250 \\$aBoard book edition.
Corresponding =500 Note
When evaluating a record for a board book, in addition to the GMD, you may also see the following =500 note:
=500 \\$aOn board pages.
Note: If a record has a board book edition statement or a =500 Note, but does not have a GMD, report the bib record to a bibliographic cataloger for review before attaching your item to it.
=336 Field
In the case of illustrated works like picture books, there should be an additional =336 field noting as such in the record as shown below:
=336 \\$atext$btxt$2rdacontent
=336 \\$astill image$bsti$2rdacontent
=521 Field
While not a required field, many juvenile records may include an age range or reading level of the work. For young adult materials, you will often see this with manga and graphic novels, as described here. The age level or rating can usually be found on the front or back cover of the work. It is not necessary for this designation to be present to attach a record, but can be useful in identifying that a record is for a juvenile or YA title, and therefore a match for the item you are attaching to the record.
For reference:
=521 0\$aAccelerated Reader$bXX$c#.#$d#.#$z####. (when applicable)
=521 1\$aAges xx - xx.$bSource (when applicable)
=521 2\$aGrades xx - xx.$bSource (when applicable)
=521 8\$aLexile number$bLexile (when applicable)
=6XX Subfield $v
For juvenile materials, subject headings in =6XX fields should include a subfield $v that designates the work as such. Note that the subfield $v is repeatable.
Look for the following subfield $v's when determining if a record refers to juvenile materials:
$vJuvenile fiction.
$vJuvenile literature.
$vComic books, strips, etc.$vJuvenile fiction. (For "fiction" comic works)
$vComic books, strips, etc.$vJuvenile literature. (For "nonfiction" comic works)
=655 Fields
Common genre/form headings for juvenile materials include:
=655 \7$aBoard books.$2lcgft
=655 \7$aPicture books.$2lcgft
=655 \7$aStories in rhyme.$2lcgft
Common genre/form headings for young adult materials include:
=655 \7$aTeen television programs.$2lcgft
=655 \7$aTeen films.$2lcgft
=655 \7$aYoung adult fiction.$2lcsh
=655 \7$aYoung adult literature.$2lcsh
=655 \7$aYoung adult drama.$2lcsh
=655 \7$aYoung adult poetry.$2lcsh
4.5. Matching Specialized Materials: Videos
Combined Records for Videos
On This Page
NC Cardinal policies state that video materials should be combined on the same record if the formats are the same. Item Catalogers should use the 024, 245, 250, 511, and 508 fields to match content, while ensuring DVD, Blu-Rays, 4K Ultra HD Blu-Rays, and dedicated combo packs are all cataloged on seperate records. This page includes guidelines for matching video items to the correct records, and information about when and how to add combined format videos.
Movies with the same content and in the same format should be combined on the same bibliographic record, even if non-content features such as DVD extras differ. Different video formats should receive their own record.
Video Formats
Item Catalogers should always check the format. Even if the title is the same, different formats should be attached to different records. The available format options for videos are:
- DVD
- Blu-Ray
- 4K Ultra HD Blu-ray
- Combo Packs (Containing 2 or more format options)
Separating records by format ensures that patrons who may only be able to play one type of format are able to specify that format when placing holds. If a patron does not care what type of format they get, circulators can offer to place a Metarecord hold in order to capture multiple format types in a single hold request.
Never add a DVD to a record for a Blu-ray or vice versa. If you are maintaining a combo pack of both formats to circulate as a single item, the combo should be on a record specific to that combination, and not added to a record for either format individually. Some libraries may have items, such as local history or archival materials, on obsolete video technology such as VHS. These items should also be added to their own record and not combined with an existing record for a DVD, Blu-ray, or 4K Ultra HD Blu-ray format of the same film.
The intention is for the NC Cardinal catalog to be as patron friendly as possible to simplify searching while ensuring that patrons do not receive items that require a technology they may not have access to.
Basic Guidelines
Some questions to ask to determine if there is a significant difference in content:
- What is the format of the disc in hand?
- Is it widescreen or not?
- What special features are included?
- What is the publication date and publisher?
Do use a single bibliographic record for videos when content is exactly the same to combine single format movies that include the following differences:
- DVD extras such as bonus content or interviews (rental versions, for example, often do not include any bonus content or special features, but they may still be merged with standard versions)
- Different cover art
- More or fewer discs, as long as the content on the extra discs is only bonus (e.g. "making-of" or "behind-the-scenes" featurettes, bloopers, trailers, etc.), or the movie is entirely contained on a single disc in one version, and spread across two discs in another. This does not include instances where an additional disc includes, for example, a totally separate, different film or additional episode/s of a television show. Such items would need to have their own record.
- UPCs (=024 field) are different, but the core content is the same. In these instances, all =024 fields from both the lead and sub bibs should be appended to the final, merged record.
- Records for videos that have different OCLC numbers (=035 field) but match in most or all other respects. In such cases, merge the records and append all OCLC numbers from both the lead and sub bibs onto the final, merged bib.
Do NOT use a single bib record for video content when the items differ from one another in any of the ways listed below. In these scenarios, a separate bib record is required.
- Different format
- Director's Cuts versus Theatrical Releases
- Colorized versions of black and white films, when the record is for one format and the item in hand is the other
- Double features that include the same film as the record, but a second film in addition to that on the record
- Wide-screen editions versus full-screen editions
- Remakes of the same film with a different cast, director, or producers
MARC fields to check
|
024 |
UPC |
If the UPC identifier is the same, your item should be added to the existing record. If the UPC identifier is different, the items should be sent to a bibliographic cataloger to check if the core content is the same. If the core content is the same, then the item should be added to the existing record, and an additional =024 field should be added with the item's UPC. When merging records that otherwise match but have different =024 fields, all =024 fields from both the lead and sub bibs should be appended to the final, merged bib. |
|
245 |
Title |
If the title of your item is different than the title in the =245 field on the record, then the item should not be added to that record. If significant other information matches, the record should be sent to a bibliographic cataloger for closer examination. |
|
250 |
Edition |
Different editions should not be on the same record if the editions are different formats (i.e. full screen versus wide screen, black and white versus color) |
|
3xx |
Physical description, including Blu-ray vs DVD vs 4K Ultra HD Blu-ray |
Blu-rays, 4K Ultra HD Blu-rays, and DVDs should not be added to the same record. Combo packs that include two or all formats should have separate records from either the individual Blu-ray, 4K Ultra HD Blu-ray, or DVD. |
|
511 |
Cast |
If the cast listed on your item is different from the cast listed in the record, the item should not be added to the record. If significant other information matches, the record should be sent to a bibliographic cataloger for closer examination. |
|
508 |
Production credits |
If the producers listed on your item are different from the producers listed in the record, the item should not be added to the record. If significant other information matches, the record should be sent to a bibliographic cataloger for closer examination. |
|
7xx |
Added entries |
If the added entries in the 7xx fields cannot be verified against the item you are adding, it should be sent to a bibliographic cataloger for closer examination of the record. |
Working with Combo Packs
Circulate as a combo
If a library purchases a combo pack that includes both a DVD disc and a Blu-ray disc (or a Blu-ray disc and a 4K Ultra HD Blu-ray disc) and the library intends to circulate both the DVD disc and the Blu-ray disc together as a set, the combo pack should be cataloged on a single bibliographic record using the Blu-ray/DVD combo MARC template. Look for the UPC in the 024 $a.
Circulate Separately
If a library decides to break up a Blu-ray/DVD combo pack and circulate the DVD and Blu-ray discs separately, the two items must be cataloged on separate bibliographic records using the DVD only, Blu-ray only, and 4K Ultra HD Blu-ray only MARC templates.
- Look for the UPC in the 024 $z (not $a). You can learn more about the use of the 024 $z here.
- If other combo packs have been separated and added to the records, they may also include a $q noting that it is for the set, and a 500 $a note similar to "Originally released as part of a Blu-ray + DVD combo pack" or "Originally released as part of a Blu-ray + 4K Ultra HD Blu-ray combo pack."
Circulate Sets Separately
If a library decides to break up other packaged sets in the same format — e.g. television season — to circulate pieces of the set separately, the packaged set must be cataloged on the same bibliographic record with the items separated using Monograph Parts.
Matching Rental Videos
Rental videos usually do not include special features and have a different UPC number than standard editions, but they should still be merged with standard editions if the core content (i.e. the film itself) is the same, according to the standards outlined here. The final, merged record must include the UPC for the rental version in a 024 $a.
4.6. Matching Specialized Materials: Kits
Cataloging Kits
On This Page
Kits should not be attached to records for any individual materials within a kit. This page includes information about identifying matching records for kits.
Kits are a collection of materials, sometimes created by a library and sometimes by a publisher or vendor. It is important that kits be easily identified and distinguished from the individual included titles, both by patrons and catalogers. Before adding a new volume or item record for a kit, Item Catalogers should search the catalog to determine whether there is a matching record for the kit (if commercially obtained) or request that a Bibliographic Cataloger create a specific record for a kit that includes information about all materials included in the kit.
Note: An Item Cataloger should not attach a multi-piece kit to a bibliographic record that is for only one of the items included in the kit.
Fields to Look for When Examining a Kit Record for a Match
- A unique title in the 245 $a (not the title of any individual book in the kit).
- The GMD $h[kit] in the 245.
- The Kit format icon.
Additionally, the MARC record must include appropriate information about all the included materials.
- ISBNs for the included materials should NOT be listed in the 020 $a, but instead in the $z.
- All titles of included items should be listed in the 500 or 505.
- Authors/creators should be listed in the 7XX fields, and a 100 should not be included unless all materials have a single author/creator.
5. Item Actions
5.1. Item Inventory
Conducting an Inventory of Your Collection
On This Page
To conduct an inventory of a collection or part of a collection in Evergreen, staff first add inventory dates to all items on the shelves in the section of the collection being inventoried, then run reports to see if any items that should have been inventoried were missed. There are two methods of adding Inventory Dates: using a checkin modifier or from the item status screen.
Words to Know
Checkin Modifier: A setting added to the Checkin screen that changes how the system processes an item when it is checked in
To conduct an inventory of a collection or part of a collection in Evergreen, staff first add inventory dates to all items on the shelves in the section of the collection being inventoried, then run reports to see if any items that should have been inventoried were missed.
There are two methods to adding inventory dates to items on the shelf.
Method One: Scan Individually
This method requires staff to use either a mobile scanner or a laptop with an attached scanner capable of being moved through the stacks. Once the scanning apparatus is set up, and the portion of the collection to be inventoried identified, follow these steps:
- In Evergreen, navigate to the check in screen.
- From the drop-down menu below the grid, select the Update Inventory checkin modifier.
- Scan the barcodes for each item on the shelf in the range you're inventorying. The date and time of the scan will be added as the inventory date to the item. Scanning in this way will not affect the status of the item.
Note: changing the Effective Date (backdating) will not change the Inventory Date.
Method Two: Update in Batch
If you are engaging in additional actions on materials that you will be inventorying, such as updating item attributes, you can load the items into the item status screen and update the inventory dates on all the items in the screen at once.
There are multiple ways to load the items into the Item Status screen:
- Scan the barcodes
- Upload a .CSV file of barcodes
- From an Item Bucket, select the items to view in the Item Status screen and choose "Open in Item Status"
Once items are in the Item Status screen, select Update Inventory from the Actions Menu.
Inventory On Checkin
When completing an inventory project, you may want to apply the Update Inventory checkin modifier when checking in items. This ensures that items that were checked out when a section was scanned but returned before running a report on missed items are not marked missing.
Inventory Report Templates
There are a number of report templates available in the Inventory and Weeding Templates and the Item Templates folders that can be used as part of the inventory process.
In the reports Interface, locate the Shared Folders. You can find the Inventory templates in the shared templates Folder labeled Admin.
- Find the Centralized Reports templates subfolder and expand it.
- Expand the Inventory and Weeding templates subfolder.
- Choose Counts if you're looking for a list with circulation counts.
- Choose Lists if you're looking for a shelf list.
- Clone any templates you wish to use.
- Run your report(s).
5.2. Deleting Items
How to Delete Copies
On This Page
Items may be deleted following three methods: from the Item Status page, from the Holdings View in the Bib Record, and from an Item Bucket. Regardless of method, items in certain statuses, including Checked Out and In Transit may not be deleted. Items in these statuses must be scanned and made available, then changed to a status of Discard/Weed prior to deletion. When deleting the last item on a record, the record will also be deleted, so care should be taken not to delete items that a library intends to replace until the replacement has been acquired.
When deleting items, it is important to first make sure the item belongs to your library. Check the barcode range as well as the owning library. The Circulating Library may not reflect the owning library. Also, be sure to display the item status to ensure that you are only attempting to delete items in a status eligible for deletion.
How to Delete Items
There are 3 methods that we recommend for deleting items.
From the Item Status Page
This method is recommended for most standard item deletions, especially when deleting multiple items at once.
- Navigate to the Item Status interface.
- Scan barcodes for items you want to delete, or upload a file of barcodes.
- Ensure none of the items have a status that is inelligible for deletion before proceeding (see below).
- Select the items you wish to delete by checking the box on the correct line.
- Choose "Delete Items" from the Actions menu.
- Confirm the deletion in the dialog box.
From the Holdings View
This method is recommended when deleting multiple items attached to a single call number.
- Navigate to the Holdings View tab of the bibliographic/title record.
- Locate the volume or item you will be deleting. Check the box on the appropriate line.
- Select the option from the Delete section of the Actions menu that matches your selections (Delete Call Numbers and Items or Delete Items).
Note: Deleting the volume/call number will delete all attached copies. Deleting the only copy attached to a call number will only work if you also choose to delete the call number.
From an Item Bucket
This method is recommended for batch deletion of single items, especially when the list is created over time or by multiple staff users.
- Add items to the bucket to be deleted.
- Ensure the Item Status column is visible. If it is not, add it from the grid settings menu.
- Select all items you wish to delete by checking the boxes on their line in the grid. Do NOT select any that are in a status that is not eligible for deletion.
- Choose Delete Selected Items from Catalog from the Action Menu.
Statuses that may not be deleted
Do NOT manually edit or delete items with statuses indicating open or incomplete transactions, because doing so would negatively impact database recordkeeping and give inaccurate results in reports.
Items with these item statuses must not be manually edited or deleted:
Checked out: Open transaction in which an item is assigned to a patron account. Do not delete items while in this status.
Lost: Open transaction in which an item is assigned to a patron account and marked as lost based on interval designated by the library system. Do not delete items while in this status.
Long Overdue: Open transaction in which an item is assigned to a patron account and marked as long overdue based on interval designated by the library system. Do not delete items while in this status.
Lost and Paid: Open transaction in which an item is assigned to a patron account and marked as lost based on interval designated by the library system. Do not delete items while in this status.
In transit: Open transaction in which an item is moving from one library branch to another. Do not delete items while in this status.
On holds shelf: Open transaction in which an item is waiting for a specific patron to pick up the item from the library. Do not delete items while in this status.
If you attempt to delete items in these statuses, you should receive a notification that you do not have permission to do so. These items MUST be scanned on the Check In screen to close the transaction before deleting.
How to delete items in a status that blocks deletion
Before deleting items in any of the item statuses listed above, follow this procedure:
- Navigate to the checkin interface.
- Set checkin modifier Supress Holds and Transits to avoid having the checkin trigger a hold capture.
- Check the item in to change its status to Available or Reshelving.
- Select the item in the checkin grid by checking the box for its line.
- Choose Mark Items Discard/Weed from the Actions Menu.
- Move forward with the deletion process.
Deleting Last Item on the Bib Record
Special care must be taken when deleting the last item record remaining on a bibliographic record, as NC Cardinal has several library settings in place that are intended to automatically clean up the library catalog:
| Delete volume with last copy=True |
| Retain empty bib records=False |
These settings mean that, when an item record is the last one on a call number record, the associated call number record is automatically deleted. If the last item and call number records are deleted from a bibliographic record, the bib record is also automatically deleted and will no longer be visible in the public catalog. Deleted bibliographic records can only be retrieved using the TCN/Database ID and will not show in the results for other catalog search methods.
Note: Do not delete the last item from a bibliographic record if you intend to replace that item. If a cataloger adds an item onto a deleted record, the bib record is still deleted and neither will be visible in the catalog.
When a cataloger is deleting the last item on a bibliographic/title record, Evergreen displays an alert message.
Last Copy Warning
If your library will not be replacing the item and it is your system practice to note when deleting a last copy, please record this information before clicking OK/Continue to force the action, as the bibliographic record will be automatically deleted and can only be retrieved if a cataloger searches by the TCN/Database ID.
Permissions Flag
If an Item Cataloger deletes the last item on a bib record, a consortium library setting (to automatically delete the last bib record, as mentioned above) triggers the automatic bib record deletion, even though the Item Cat does not have permission to delete bib records. So, the Item Cat may see a message noting that permission is denied, but no further action is required. The bib record is still deleted and there is no cause for concern.
5.3. Marking Items Lost
How to Mark Items Lost
On This Page
Marking items lost changes the item status, stops the accrual of fines, and bills the patron for the item. Items are automatically marked lost after a specific time-period as defined in the library's settings. Staff may also mark an item lost manually from the patron's account.
Once an item has been overdue for the amount of time established by your library system, Evergreen will mark the item Lost in the borrowing patron’s account automatically.
When the item is marked Lost, several actions will take place:
- The item will go into the status of “Lost”
- The accrual of overdue fines will be stopped
- The patron will be billed for the item based on library-wide settings and the item price
The Lost item is still "checked out" to the patron and that circulation transaction remains open until the item is returned or the bill for the item is paid.
Optionally the patron can be billed for the item price, a lost processing fee, and any overdue fines can be voided from the account. Lost items can be included either in the "Items Checked Out" or "Other/Special Circulations" sections of the "Items Out" view of a patron’s record. These options are all controlled by library settings. Patrons can also be sent an email or print notification that the item was marked lost and billed to their library account.
Mark Items Lost Manually from the Patron Account
If a patron informs you that an item was lost prior to the date when Evergreen would automatically mark it lost, you can manually adjust the status and trigger the relevant bills.
- Retrieve patron record and click Items Out.
- Check the box to the left of the item to select it.
- Select Mark Lost (by Patron) from the Actions menu.
- The lost item now displays as lost in the Other/Special Circulations section of the patron record.
- The lost item also adds to the count of Lost items in the patron summary on the left (or top) of the screen.
5.4. Marking Items Damaged
How to Mark an Item Damaged
On This Page
Items with a status of Damaged are not holdable and are not visible in the OPAC. There are four methods for changing an item's status to Damaged: From the Checkin screen, From the Item Status screen, From the Patron Account, and From the Holdigns Editor. Libraries can elect to automatically bill patrons for damaged items.
Items with a status of Damaged are not holdable and are not visible in the OPAC. There are five methods for changing an item's status to Damaged:
- From the Checkin screen
- From the Item Status screen
- From the Patron Account
- From the Holdings Editor
- From the Holdings tab in the bib record
Note: Do NOT mark resource sharing items damaged. Instead, fill out the damage slip and let the owning library decide whether or not to use this status.
From the Checkin Interface
This option is useful when assessing damage when items are returned.
- Check the item in as usual.
- Select the item by checking the box on the line.
- Choose "Mark Item Damaged" from the Actions menu.
- Click Submit in the pop-up box to confirm the status change.
From the Item Status Screen
This option is useful when marking multiple items damaged at once, such as from a shelf-pull, after an adverse weather event, or from a shipment that was severely damaged in transit.
- Scan the barcodes for the items you want to mark Damaged OR upload a .CSV file of barcodes for damaged items.
- Select individual lines, or use the check box above the grid to select all items.
- Choose "Item As Damaged" from the Mark section of the Actions menu.
- Click Submit in the pop-up box to confirm the status change.
From the Patron Account
This option should be used if the patron has returned the item directly to the desk and would like to pay for any damage immediately.
- Navigate to the patron's account.
- Go to the "Items Out" tab.
- Check the box to select the item to be marked Damaged.
- Select "Mark Damaged" from the Actions menu.
- Click Submit in the pop-up. This will confirm the status change and simultaneously check the item in.
If your library automatically bills for damage, the bill should appear on their account immediately. You can take payment for it following your library's policies.
From the Holdings Editor
This option only works on items with a current status that can be changed. If an item is checked out to a patron, in transit, on the holds shelf, or otherwise in a non-editable status, it cannot be marked damaged in the holdings editor.
- Navigate to the Item Attributes or combined Holdings tab in the Holdings Editor.
- Locate the "Item Status" attribute at the top of the Identification column.
- Set the Item Status to "Damaged."
- Click Apply All & Save at the botton of the Editor.
From the Holdings View Tab
This option is useful if you are already in the bib record and would like to mark the item Damaged without leaving the record, or if you need to mark multiple copies of the same title damaged at the same time.
- In the bibliographic record, click on the Holdings View tab.
- Scope to your library.
- Click the carrot next to the call number to see all associated copies.
- Check the boxes of the copies to mark damaged.
- Select Mark Item Damaged from the Actions Menu.
- The status should update automatically without needing to submit within a pop-up.
Billing for Damaged Items
A library can choose whether to bill a patron when an item is marked damaged. This policy will be reflected in Library Settings, and is applied uniformly across the system. This means it cannot be applied differently for different patron types or item types.
If your library has opted to bill patrons for damaged materials, a second pop-up will appear after an item that was checked out to a patron has been marked damaged.
Fee: The amount in the Fee box is based on the Price listed in the item's attributes. Some libraries may also opt to add a standard processing fee that will automatically be added to the item price when calculating the fee. The option to add a processing fee is selected in Library Settings. If you would like to change the fee amount (for example, to reduce it for damage that is easily repaired and doesn't require purchasing a replacement copy), this field is editable.
Type: A type needs to be selected from this drop-down in order to save the bill, but the billing type listed on the transaction will be "Damaged" regardless of what you select. (This is a known bug. Feel free to add heat!)
Note: It can be useful for records to note what the damage was. Type this information in the Note field.
No Charge: Switching from Charge Fees to No Charge allows you to mark an item damaged without charging the patron.
5.5. Marking Items Discard/Weed
How to Mark an Item Discard/Weed
On This Page
Marking items as Discard/Weed allows libraries to remove weeded items from the OPAC before deleting, and makes reports on deleting items easier to run and read. Items can be marked as Discard/Weed in three different ways.
Before deleting items, it is recommended to put them in a status of Discard/Weed. Items with a status of Discard/Weed are not holdable and are not visible in the OPAC. After deletion, items retain this status in the database. They cannot be accessed from the staff client, but they may appear on reports, and the status helps ensure they are accounted for accurately.
There are four methods for changing an item's status to Discard/Weed:
- From the Checkin screen
- From the Item Status screen
- From the Holdings Editor
Note: Do NOT manually change the item status from Checked out, In transit, Long Overdue, Lost, Lost and Paid, or On holds shelf to another status using the Item Editor screen, as this simply relabels the items and does not close the underlying transaction correctly in the patron account (for Checked Out, Lost, Long Overdue, or Lost and Paid); or target a new item to fill the patron hold (for In transit or On holds shelf items).
From the Checkin Interface
This option is useful when weeding items as they are returned, or when weeding items in a non-editable state, such as Lost.
- Check the item in as usual.
- Select the item by checking the box on the line.
- Choose "Mark Item Discard/Weed" from the Actions menu.
- Click Submit in the pop-up box to confirm the status change.
From the Item Status Screen
This option is useful when weeding at once, such as from a weeding report.
- Scan the barcodes for the items you want to weed OR upload a .CSV file of barcodes for items to weed.
- Select individual lines, or use the check box above the grid to select all items.
- Choose "Item As Discard/Weed" from the Mark section of the Actions menu.
- Click Submit in the pop-up box to confirm the status change.
From the Holdings Editor
This option only works on items with a current status that can be changed. If an item is in a status of Checked out, In transit, Long Overdue, Lost, Lost and Paid, or On holds shelf it cannot be marked Discard/Weed in the holdings editor. If you intend to immediately weed an item in one of these states, you must first check it in, cancel the associated transit, and/or re-target the hold.
- Navigate to the Item Attributes or combined Holdings tab in the Holdings Editor.
- Locate the "Item Status" attribute at the top of the Identification column.
- Set the Item Status to "Discard/Weed."
- Click Apply All & Save at the botton of the Editor.
5.6. Marking Items Missing
How to Mark an Item Missing
On This Page
The Missing status should apply to items that are expected to be on the shelf but can't be located. Items with a status of Missing are not holdable and are not visible in the OPAC. There are three methods for changing an item's status to Missing: from the Item Status screen, from the Holdings Editor, and from the Holdings View in the Bib record.
Items that are listed with a status of Available but can't be located on the shelf should be marked Missing rather than Lost. Unlike the Lost status, Missing does not retain a link to a circulation transaction or result in charges to a patron account. There are three methods for changing an item's status to Missing:
- From the Item Status screen
- From the Holdings Editor
- From the Holdings tab in the bib record
Note: Items that are checked out to a patron should never be converted directly to Missing. Doing so will leave an open transaction on the patron's record. They should be marked as Lost, and resulting bills paid or forgiven. If a patron claims they returned an item, mark it Claims Returned.
From the Item Status Screen
When you are marking items missing from a Report (such as an inventory report), the Item Status screen is the easiest way to change the status in batch.
- Upload a .CSV file of barcodes for Missing items.
- Select individual lines, or use the check box above the grid to select all items.
- Choose "Item As Missing" from the Mark section of the Actions menu.
- Click Submit in the pop-up box to confirm the status change.
From the Holdings Editor
This option is useful when marking a single item Missing. However, be sure to check that the current status is Available before changing it to avoid retaining an open transaction on a patron account.
- Navigate to the Item Attributes or combined Holdings tab in the Holdings Editor.
- Locate the "Item Status" attribute at the top of the Identification column.
- Set the Item Status to "Missing."
- Click Apply All & Save at the botton of the Editor.
From the Holdings Editor
This option is useful if you are already in the bib record and would like to mark the item Missing without leaving the record, or if you need to mark multiple copies of the same title missing at the same time.
- In the bibliographic record, click on the Holdings View tab.
- Scope to your library.
- Click the carrot next to the call number to see all associated copies.
- Check the boxes of the copies to mark missing.
- Select Mark Item Missing from the Actions Menu.
5.7. Replace Item Barcode
How to Replace Item Barcodes
On This Page
The four methods for replacing barcodes include the Replace Barcode function in the Circulation menu, an Action in the Item Status screen, updating the barcode directly in the Holdings Editor, and from the Holdings View tab in the bibliographic record.
As part of a re-barcoding project, when the incorrect barcode was applied, or when a barcode has been damaged, staff may need to update an item's barcode in Evergreen. There are four methods for doing so:
- Replace Barcode function in the Circulation menu (recommended method)
- From the Item Status screen
- In the Holdings Editor
- From the Holdings View in the Bib Record
Replace Barcode Function
The easiest and recommended option for changing barcodes is to use the function available in the Circulation menu.
- From the Circulation menu, select Replace Barcode.
- Scan or manually input the current barcode.
- Scan or manually input the new barcode.
- Click Submit.
From the Item Status Screen
This option is useful when updating barcodes for multiple items.
- Scan the barcodes for the items the need new barcodes OR upload a .CSV file of barcodes to be replaced.
- Select individual lines, or use the check box above the grid to select all items.
- Choose "Replace Barcodes" from the Edit section of the Actions menu.
- Enter the new barcode for the first item in the pop-up and click submit.
- The pop-up for the next item will appear immediately.
- Continue to update barcodes and click submit for each until all are complete.
From the Holdings Editor
This option is recommended if you need to make changes to other item attributes or the call number.
- Navigate to the Holdings tab in the Holdings Editor.
- Locate the "Barcode" field.
- Scan or manually enter the new barcode.
- Click Apply All & Save at the botton of the Editor.
From the Holdings View
This option is useful if you are already in the bib record and would like to change the barcode without leaving the record, or if you need to update the barcodes for multiple copies of the same title.
- In the bibliographic record, click on the Holdings View tab.
- Scope to your library.
- Click the carrot next to the call number to see all associated copies.
- Check the boxes of the copies to mark damage.
- Select Replace Barcodes from the Actions Menu.
6. Processing New Items
6.1. New Items and Holds
Activating Holds on Newly Cataloged Items
On This Page
When processing new items, catalogers should use the Retarget Local Holds Checking Modifier in order to ensure the newly cataloged item is considered for hold fulfillment before shelving.
Because of the way Evergreen targets holds, newly cataloged items are not guaranteed to fulfill pre-existing holds after the new item record is created unless staff take additional actions when checking these items in for the first time. In order to have Evergreen immediately add newly cataloged items to the pool of potential copies eligible to fill holds, staff can either use Checkin Modifiers or manually retarget a patron's hold. Using Checkin Modifiers is generally faster, since newly cataloged items must be checked in anyway, to change their status from In process to Available/Reshelving.
NOTE: If no action is taken to retarget a new item for holds, the item may begin to appear on the pull-list for holds requests within about 24 hours.
Checkin Modifiers
If your cataloging turn-around time is shorter than 24 hours you can ensure the new copy is captured correctly at check in by checking in the item using the check in modifiers Retarget Local Holds and Retarget All Statuses:
NOTE: Remember that checkin modifiers are 'sticky', so be sure to uncheck the boxes when you are finished, as these modifiers should not be applied to normal checkins.
Manual Retargeting
If you need to manually retarget the item to capture for a hold:
-
After adding the item, click on the View Holds tab.
- If there are outstanding hold requests, select the hold from a patron in your system that is next in line.
- Choose Find Another Target from teh Actions Menu. This forces Evergreen to re-target the hold and recognize the newly cataloged item.
- Check in the new item to capture it for the selected hold.
DO NOT retarget more than one hold at a time and do not retarget a hold for any patron (line item) where another barcode is already listed as a target.
Impact of Centralized Cataloging on Holds
Items, by default, will be targeted to fill a hold at the workstation branch where they are checked in. When library systems catalog centrally, it can mean that items will always get checked in for the first time at the main branch and immediately target the next hold for pickup only at the main branch, never targeting holds at other branches until all holds at the main branch are satisfied).
To mitigate that effect, there are two options:
Retain In Process Status during Transit to Owning Branch
You can send some of your new copies to other branches while they are still in an In process status. Staff at each branch may check the newly cataloged items in for the first time using the same checkin modifiers as above.
This option is recommended for libraries with a very large volume of materials being cataloged centrally and shipped to branches, but requires they have a good system in place for tracking items that are not placed In Transit.
Note: Because these items will not be in an In transit status when sent to the other branch, you will need to notify staff at the branch of the required special handling and wrap/label the items so that they are checked in with the appropriate checkin modifiers.
Checkin Without Modifiers at the Central Branch
If catalogers at the central branch check items in without any checkin modifiers, the items should be sent to an In Transit status. Without the Re-Target Local Holds modifier applied, the item should bypass holds at the checkin branch. Staff at each branch may check the newly cataloged items in for the first time using the same checkin modifiers as above.
This option is recommended for libraries that don't usually catalog centraly, and only have occassional items that need to be handled this way. Items are less likely to get misplaced because they are put into an In Transit status, but the extra step of turning off the circ modifier for items being sent to other branches may create issues if it's missed.
6.2. Print Spine Labels
Printing Spine Labels for Newly Cataloged Items
On This Page
Printing Spine labels requires configuration of your browser, your printer, and your Evergreen settings. Staff can create templates to ensure consistency.
Configuring Your Browser
Hatch
Spine label printing does not work well with Hatch, so it is recommended that you remove Hatch completely from the workstation where spine labels will be printed. If you need Hatch for other functions, create a second Chrome profile without Hatch to be used specifically for cataloging and spine label printing.
Headers and Footers
Before printing spine labels, you will need to turn off print headers and footers in your browser. You should configure your browser so that Chrome does not add headers and footers to items printed on certain printers.
You can turn off these headers and footers using the following steps:
- In the Chrome menu, click Print… to open the print preview screen.
- Click More Settings.
- Uncheck Headers and footers.
The Label Printing Interface
To set-up printing in Evergreen, you will need to open the Label Printing interface. There are four different places where you can print labels:
In the Holdings Editor
- In the Holdings Editor, go to the Defaults tab and check the box for Print Item Labels on Save & Exit.
- Add items or call numbers and items, Save & Exit.
- Print Labels will open in another tab.
- Make any edits needed for call number spacing under the Call Number tab.
- The Print Labels interface will always open after Save & Exit until you uncheck the box.
From Item Status
- Go to the Item Status List View by selecting Search > Search for items by barcode or Circulation > Item Status.
- Scan or enter one or more barcodes.
- Select the items needing labels (you can print all or a subset).
- Under the Actions menu, go to Show > Print Labels.
From Item Buckets
- Place barcodes in bucket for label printing.
- Go to the Item Buckets page (Cataloging > Item Buckets).
- Open the bucket used for label printing.
- Select the items needing labels (you can print all or a subset).
- Under the Actions menu, go to Show > Print Labels.
From the Bibliographic Record
- Go to the Holdings View tab in a bibliographic record.
- Select the items needing labels.
- Under the Actions menu, go to Show > Print Labels.
Creating and Using Print Templates
Catalogers may print labels by using or modifying the default template, creating and saving their own templates, or importing templates created by another cataloger. Catalogers may use multiple templates to accommodate special print jobs, such as narrow books.
To create a template, type a name for the first template into the Template field and click Save, then make any changes needed to the template. Create as many templates as needed. Be certain to save each template after any changes.
To create templates without navigating into a specific item record first:
- Navigate to Item Buckets.
- No need to open a bucket, just select "Print Labels" from the Action menu in the Item Bucket Interface.
- Click on the Templates tab.
- Make edits.
- Save.
Troubleshooting print issues
- Make sure your printer drivers are up to date.
- You can change font, size, and weight. These fonts generally worked well: Arial, Arial Black, Garamond, Courier, Comic Sans MS, Verdana.
- Set margins to none and make sure options for background graphics and headers and footers are deselected.
- To try to resolve blank labels in between printed labels:
- Double check your Label Template and printer configuration. Pay special attention to your gap height.
- Try adjusting your scale in the print dialog. Scaling back to 95 may eliminate blank labels in between printed labels.
Note: There are a number of devices that can print spine labels with Evergreen.
External Training Resources
Several other Evergreen consortia have training videos and recordings available to help with spine label set-up:
- The BC Libraries Cooperative video on printing spine labels in a sheet.
- Lynn Floyd presented at the 2019 Evergreen conference and her Powerpoint presentation (called Labels, Labels, and More Labels) is downloadable from this page: https://evergreen-ils.org/conference/2019-evergreen-international-conference/2019-presentations/
6.3. Cover Images
Adding Cover Images Manually
On This Page
Cover Iamages may be added to records that don't already have them, or that show the incorrect cover, by uploading the correct image in the bibliographic Record summary.
When adding holdings, many titles that already exist in the catalog will have cover images. In cases where the title does not have a cover image, you will see the NC Cardinal placeholder:
Manual Upload
You can manually upload the correct cover image from the bibliographic record:
- Select Upload Cover Image from the Other Actions Menu.
- In the pop-up modal, click the button to Choose File.
- Click the Upload Cover Image button.
File Types
Make sure you have the correct file type. The following are all acceptable:
- jpg
- png
- xpm
- xbm
- gif
- bmp
Image Size
The scaling algorithm will size images to fit the dimension of each bounding box, while preserving aspect ratio. This means that the largest dimension of any image will be scaled to match the bounding box.
- Small = 55 px wide x 91 px high
- Medium = 120 px wide x 200 px high
- Large = 475 px wide x 787 px high
Potential Errors
If there is an error uploading your file, you will be shown error text in the modal. Error messages include the following:
- Not authenticated. Expired login? Not authorized. Check your permissions.
- Not found. Bib record deleted?
- Invalid global compression value.
- Talk to your system administrator.
- Do not know where to upload files.
- Talk to your system administrator.
- Can not save uploaded file.
- Talk to your system administrator.
- File size larger than configured limit.
- Check your library setting or try a smaller file.
- Error parsing the image. Is it a common image filetype?
- Error uploading or processing file.
Note: If you can't see the uploaded cover image, try viewing the record in an incognito window, or clearing your cache.
Open Library
All the cover images that are not manually uploaded in Evergreen come from Open Library, which is an open-source initiative of the Internet Archive, a 501(c)(3) non-profit, building a digital library of Internet sites and other cultural artifacts in digital form. Other projects include the Wayback Machine, archive.org and archive-it.org.
Cover images are based on the ISBN in the bibliographic record. Evergreen currently only uses the first ISBN to search Open Library. Some covers may be missing for some ISBNs. Images are updated by registered Open Library users and by bots and may sometimes contain incorrect images.
You can add or correct the image chosen by Open LIbrary by changing the first ISBN in a bib record to one that matches the correct image in Open Library.
7. Customized Item Messages
7.1. Item Alerts
Action-Triggered Alerts
On This Page
The Item Alerts feature enables library staff to attach customized notifications to items during specific actions like check-ins, check-outs, or renewals. There are two types of alerts: temporary and persistent. Adding alerts involves selecting an alert type, entering details, and saving via one of four interfaces: Bibliographic Record, Holdings Editor, Item Status Screen, or Check-in Screen.
The Item Alerts feature allows library staff to add customized alert messages to items. The item alerts will appear when a specific event takes place, such as when the item is checked in, checked out, or renewed.
Item Alerts should be used when information needs to be shared with staff at the point of a specific functions or action. They are not searchable in either the staff catalog or the OPAC.
Alert Types
Alerts can be temporary or persistent:
-
Temporary alerts will be disabled after the initial alert and acknowledgement from staff.
-
Persistent alerts will display each time the alert event takes place.
Item Alerts can be configured to display at the circulating or owning library only or, alternatively, when the library at which the alert event takes place is not the circulating or owning library. Item Alerts at check in can also be configured to provide options for the next item status that should be applied to an item. Library administrators have the ability to create and customize Item Alert Types and to suppress item alerts at specific org units. See the Item Alerts Administration documentation for more information.
Adding Alerts
The basic process for adding alerts is the same regardless of which interface you use.
-
Select an Alert Type to determine which functions will trigger the alert.
- Add the alert details to the Alert Note field.
-
Select the box next to Temporary? if this alert should not appear after the initial alert is acknowledged. Leaving the Temporary? box unchecked will create a persistent alert that will appear each time the action to trigger the alert occurs, such as check in or check out.
- Click the Add New button.
-
Select Apply Changes to save the new Item Alert.
Item Alerts can be added or managed from 4 interfaces. Additional intructions for accessing the alert modal from each interface are below.
Accessing Item Alerts from the Bibliographic Record
-
In the Bibliographic/Title record, navigate to the Holdings View tab. Scope the view to your library branch or system and check the box to Show Copies.
-
Select the copy you want to add an alert to by checking the box on the barcode line.
- Select Item Alert from the "Add" section of the Action menu.
Accessing Item Alerts from the Holdings Editor
Click on the Alerts link in the Alerts, Notes, Tags, Statistics column.
Accessing Item Alerts from the Item Status Screen
- Scan the barcode of the item you will be adding an alert to, or upload a list of barcodes.
- Select the item(s) you will be adding alerts to.
- Choose Manage Item Alerts from the Actions menu.
- A new tab with the modal will open. If you have selected more than one item, the modal title will state the number of items.
Accessing Alert from the Checkin Screen
- Scan the barcode to check it in.
- Select the item to add an alert.
- Choose either Add Item Alert or Manage Item Alerts from the Actions menu.
- A new tab with the modal will open.
7.2. Item Tags
Searchable Item Tags
On This Page
Item Tags enable library staff to apply searchable, pre-defined labels to items, serving as a preferable alternative to Item Notes. Currently, NC Cardinal limits Item Tags to Digital Bookplates, requiring a standardized label format for donations.
Item Tags allow staff to apply custom, pre-defined labels or tags to items. Alternatively, a library may wish to use an Item Tag instead of an Item Note, because unlike Item Notes, Item Tags are searchable within the catalog.
In order to keep the OPAC from getting too cluttered with additional text or information under each individual item, it is preferred that you use these sparingly and try to limit the number of characters as much as possible.
- NC Cardinal is currently limiting the "Type" of Item Tag to Digital Bookplates as these are already in use by some libraries.
- Create a standardized list of labels to apply uniformly to your Item Tags. For example, for all donations in memory of an individual or group, you might create the label "Donated by [insert name here] in memory of [insert name here]." You would then use that same template for all subsequent in kind donations.
- Limit the number of characters in your label/s to no more than 30, including spaces,not including donor names which may be lengthy.
Searching for Tags
You must request to make tags searchable at your library before using this feature. Submit a Help Ticket to make this request.
To search by Item Tags in your library's OPAC:
- Select Digital Bookplate in the Type dropdown menu in the catalog.
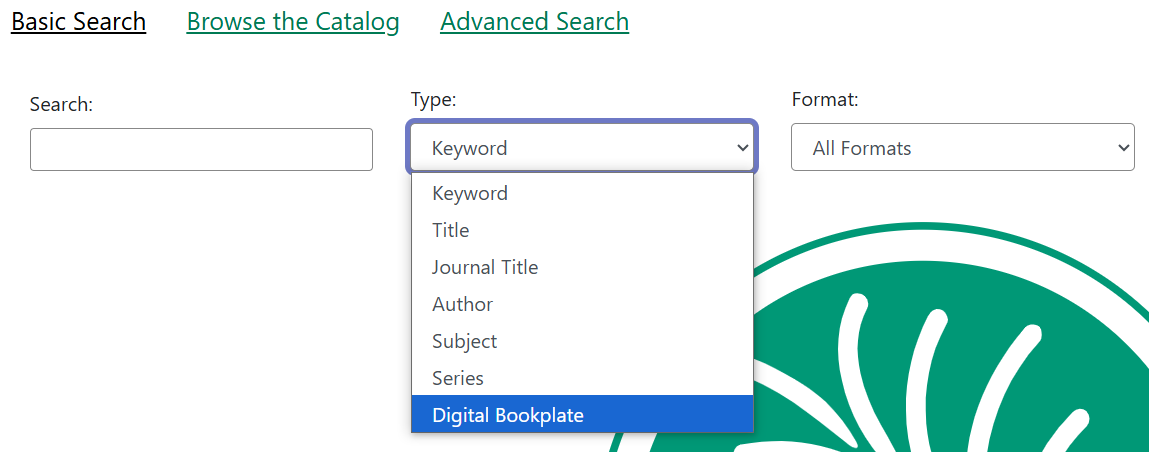
- Input a keyword related to the bookplate label or text (i.e. the name of the donor).
- Search as normal.
Advanced Search Options
- Construct a search using the following syntax: copy_tag(item tag type code, search term)
-
- For example: copy_tag(bookplate, friends of the library)
- Conduct a wildcard search across all item tag types: copy_tag(*, smith)
Adding Existing Item Tags to Items
Item Tags can be added to existing items or to new items as they are cataloged. To add an item tag:
-
In the Holdings Editor, select Edit Item Tags. This will open a modal named Managing tags for item.
-
Select the Tag Type from the drop down menu and start typing in the Tag field to bring up tag suggestions from the existing item tags. Select the tag and click Add Tag.
-
Repeat this as needed for other tags.
-
Once you have added your tags and done any other tag work, select Apply Changes. The modal will close. To close without saving, select Close.
-
Proceed with the rest of your edits to the item, and then select either Apply All & Save or Apply All, Save & Exit to finish your edits.
For More Information
While Item Catalogers may apply tags in the Holdings Editor, only Bibliographic Catalogers may create new tags. Instructions for this process are available in the Bibliographic Cataloging Knowledge Book.
Removing Applied Tags
- Click on Tags in the Holdings Editor.
- Hover on the tag row of the tag you want to edit. This will to cause the actions for Edit Tag and Remove to appear under the tag in the grid.
- Click Remove. The tag will immediately dissapear.
- Click Apply Changes.
Note: The removale will not be complete until you click the Apply All & Save button in the Holdings Editor.
Editing Existing Tags
Click on will open the tags administrative interface in a new tab) and Remove Tag. + TIP: If you need to perform administrative actions on tags, the Manage Tags button will also open the tags administrative interface in a new tab.
7.3. Creating New Item Tags
Bib Catalogers May Create New Item Tags
On This Page
While Item Catalogers may add existing Item Tags to item records, only bibliographic catalogers may create new alerts. They may do so in the Local Admin menu. They may also edit and delete existing tags.
Item Tags are associated with a Item Tag Type and are used to configure the list of tags that can be applied to copies, such as a list of memorial or donation labels, that are applicable to a particular organizational unit.
Create Item Tags
-
Go to Administration→Local Administration→Item Tags.
-
In the upper left hand corner, click New Record. A dialog box will appear. Assign the following to create a new Item Tag:
-
Item Tag Type: select the Item Tag Type with which you want to associate the new Item Tag.
-
Label: assign a label to the new item tag.
-
Value: assign a value to the new item tag. This will display in the catalog.
-
Staff Note: a note may be added to guide staff in when to apply the item tag.
-
Is OPAC Visible?: If a item tag is OPAC Visible, it can be searched for and viewed in the OPAC and the staff catalog. If a item tag is not OPAC Visible, it can only be searched for and viewed in the staff catalog.
-
Owner: select the organization unit at which this tag can be seen and used.
-
-
Click Save and the new Item Tag will appear in the list.
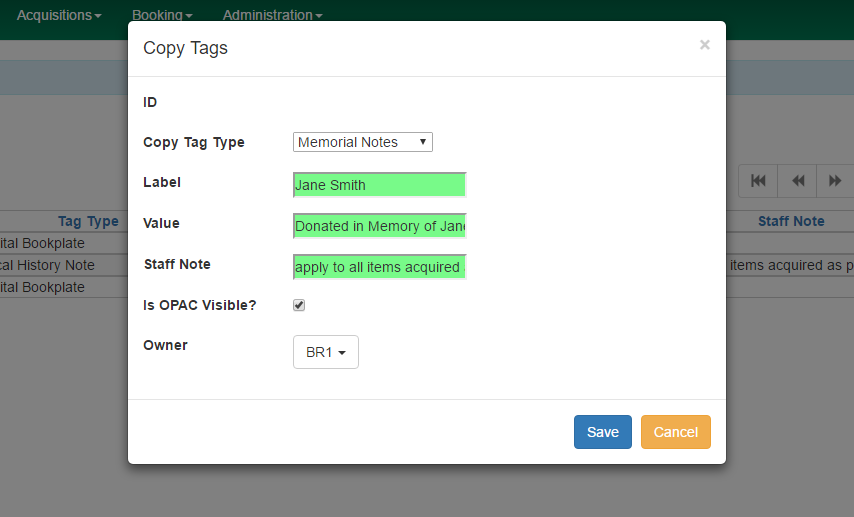
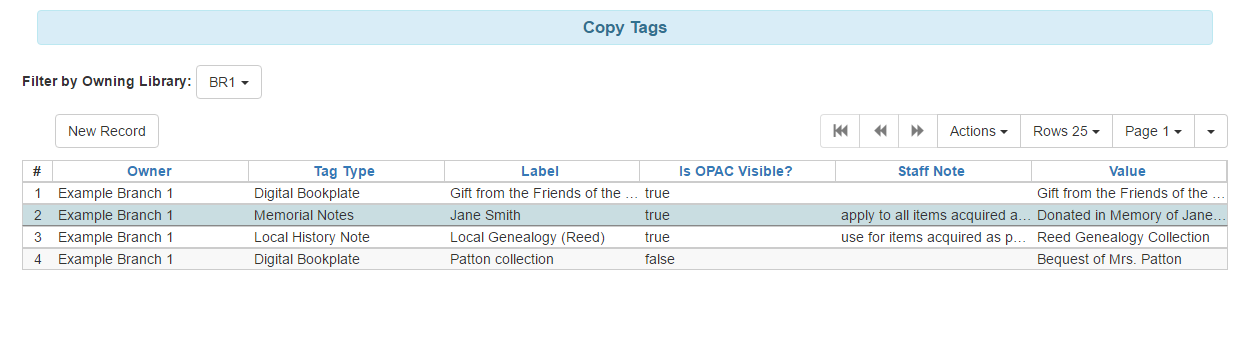
Managing Item Tags
Editing Tags
Existing item tags can be edited by selecting a tag and clicking Actions→Edit Record or right-clicking on a tag and selecting Edit Record. The dialog box will appear and you can modify the item tag. Click Save to save any changes. Changes will be propagated to any items that the tag has been attached to.
Deleting Tags
Existing item tags can be deleted by selecting a tag and clicking Actions→Delete Record or right-clicking on a tag and selecting Delete Record. Deleting a tag will delete the tag from any items it was attached to in the catalog.
7.4. Item Notes
Fully Customizable Item Notes
On This Page
Item notes allow libraries to attach local holdings information to their copies of titles outside the shared record. While public notes appear in the OPAC, they are not searchable, and the number of visible notes should be limited to enhance catalog usability. Notes can be added or edited in the Holdings Editor or Holdings View tab.
Item notes are free text fields that include a note title, note content, and checkbox to indicate whether a note is public. Public notes are visible in the OPAC, but not searchable. Neither item note titles nor item note contents are controlled, and there is no administrative interface to control notes.
Note: NC Cardinal recommends limiting the number of notes made public to avoid impacting the public catalog. Only Notes that are helpful for patrons should be made visible, and they should be limited in length.
Adding Notes to Items
Notes can be added or edited from the Holdings Editor, or directly from the holdings view tab.
From the Holdings Editor
Item notes can be added to existing items or to new items as they are cataloged. To add an item note in the holdings editor:
-
In the Holdings Editor, select Edit Item Notes. This will open a modal named Managing notes for item.
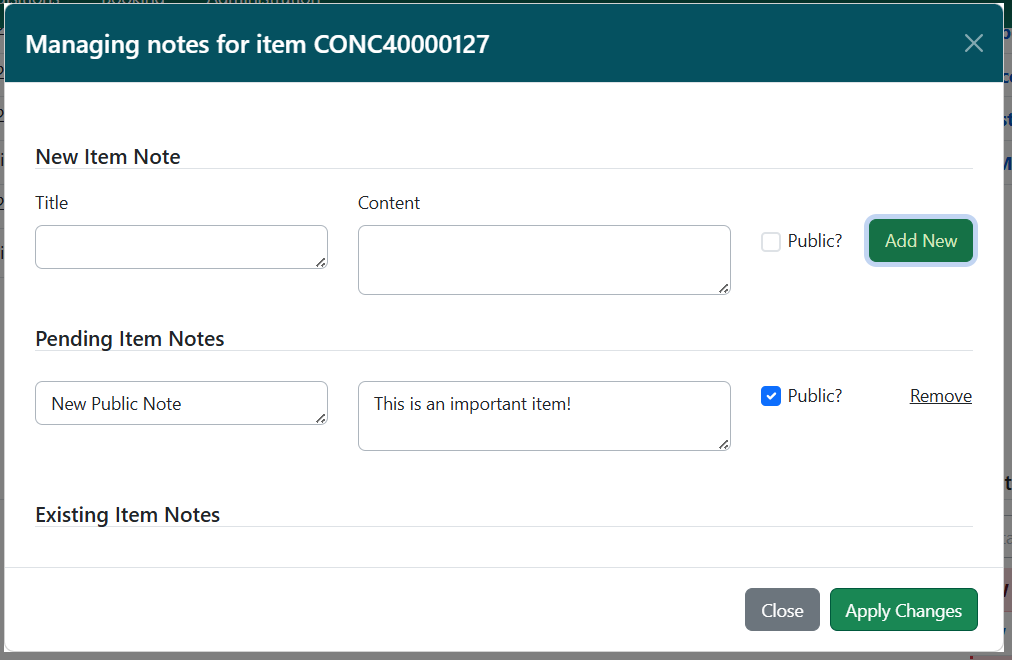
- Enter a title and content for your note. Select the Public? checkbox if you want the note to be visible in the OPAC.
- Select Add New. The new note will appear below, under a heading labeled Pending Item Notes.
- Repeat this as needed to add other notes. Notes will remain pending until the item is saved in step #6.
- You can edit or remove notes before saving. Text entries for note title and content can be edited directly in their respective fields, and you can also change the Public checkbox selection. To remove a note, select Remove on the right side of the note’s line.
- Once you have added your notes and done any other notes work, select Apply Changes. The modal will close.
- Proceed with the rest of your edits to the item, and then select either Apply All & Save or Apply All, Save & Exit to finish your edits.
From the Holdings View
- In the bibliographic record, click on the Holdings View tab.
- Scope to your library. Make sure you have the boxes for Show Call Numbers and Show copies checked.
- Locate the copy to which you want to add the note. You can only add notes at the copy (barcode) level, not the call number. Check the box to select it.
- Select Item Note from the Add section ofthe Actions menu.
- A modal will pop up. Proceed to create a note following the same steps as outlined above.
Note: You can add the same note to multiple copies by selecting each barcode from the holdings view grid, then adding the note just once.
Editing Item Notes
Note titles and content are free text, and can be edited.
-
In the Holdings Editor or the Holdings View tab, select Edit Item Notes from the Actions Menu. This will open a modal named Managing notes for item.
-
Make your desired edits to the note title, content, and public checkbox.
-
Once you have finished, select Apply Changes. The modal will close.
Removing Item Notes from Items
To remove an item note from a item:
-
In the Holdings Editor or the Holdings View tab, select Edit Item Notes from the Actions Menu. This will open a modal named Managing notes for item.
-
Select Remove on the right side of the note for the note(s) you want to remove.
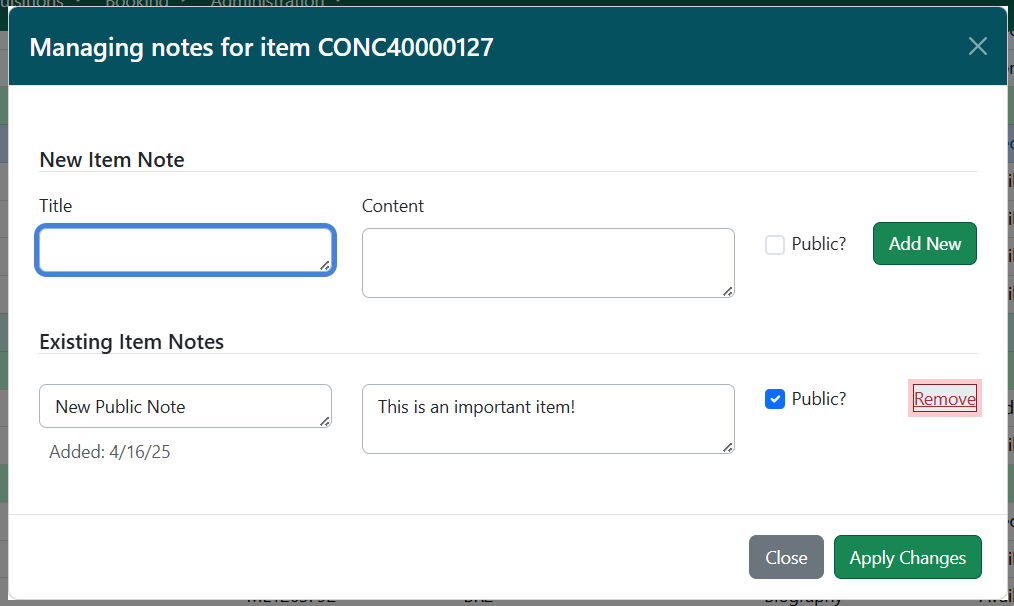
-
You can also Undelete a removed note before you close the modal. To do this, select Undelete on the right side of the appropriate note.
-
Once you have finished, select Apply Changes. The modal will close.
NOTE: Copy level notes are not searchable in the OPAC. Please request a list of items with donation copy notes via help ticket.
7.5. Statistical Categories
Adding Statistical Categories to Items
On This Page
Item statistical categories in the Holdings Editor allow tracking circulations by a variety of locally important metrics. Stat Cats may be created in Local Administration and assigned to books in the Holdings Editor.
Item stat cats appear in the Holdings Editor. You might use item stat cats to track books you have bought from a specific vendor, measuring the local popularity ofspecific genres, or donations.
Creating an Item Stat Cat
To create a new item stat cat,
-
Go to Administration → Local Administration → Statistical Categories Editor - Item.
-
Click New Statistical Category Editor - Item.
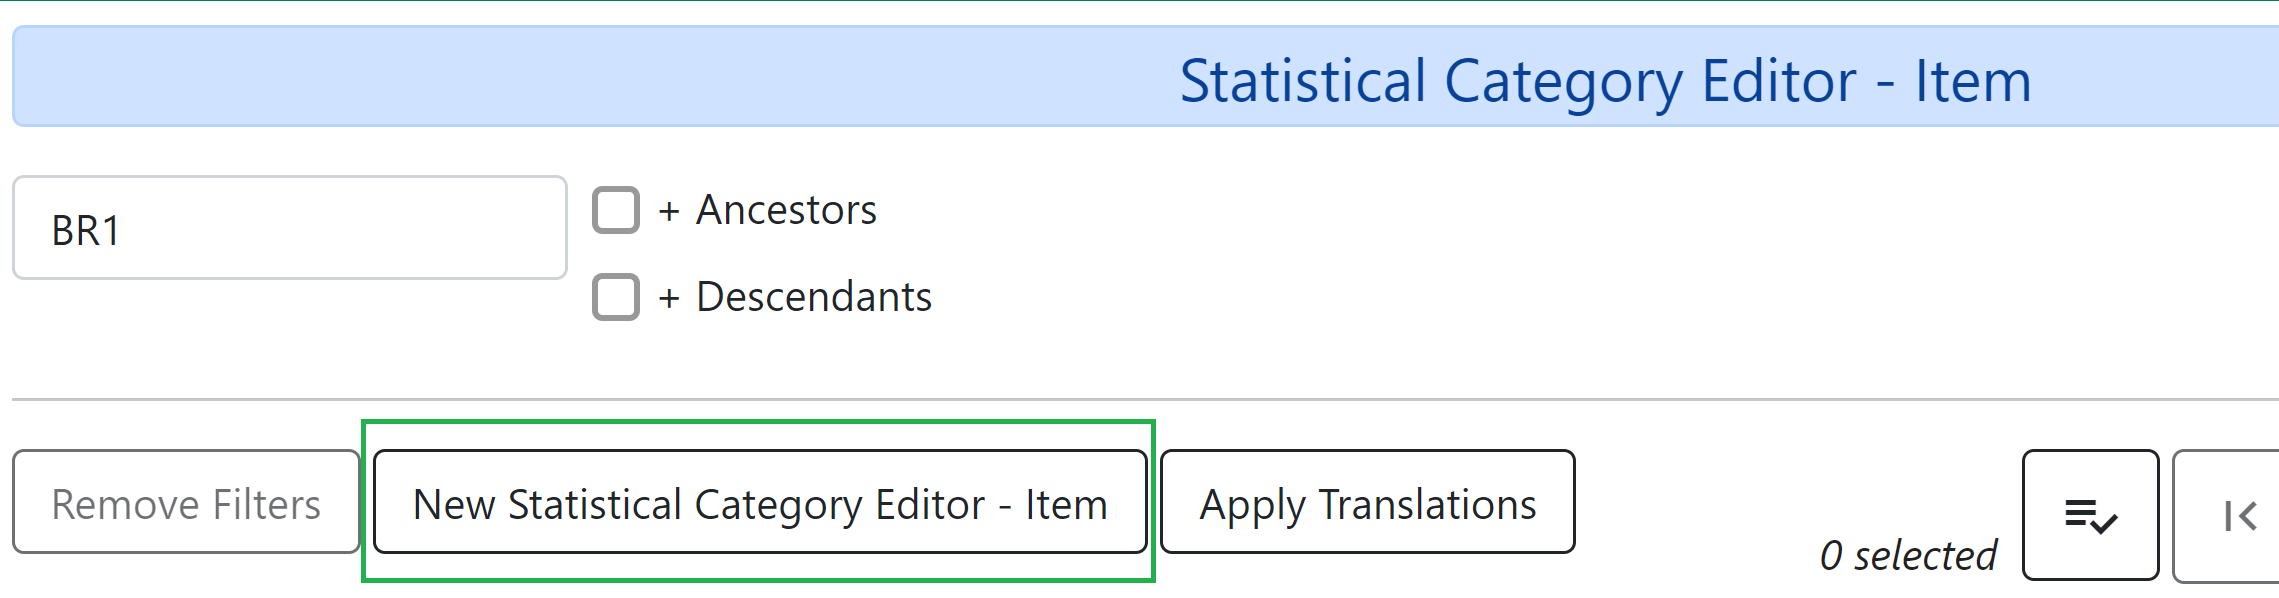
-
The editor will open, where you can set the following:
-
Name: This is what will appear in the Holdings Editor.
-
Owning Library: Select the library for which the stat cat applies.
-
Required: Select this option if the category must be assigned a value when editing the item attributes.
-
OPAC Visible: Select this option if the category should be displayed in the OPAC.
-
Checkout Archive: Select this option if the category and its values for the item should be archived with circulation data.
-
SIP Field: Select the SIP field identifier that will contain the category and its value (if applicable).
-
SIP Format: Specify the SIP format string (if applicable).
-
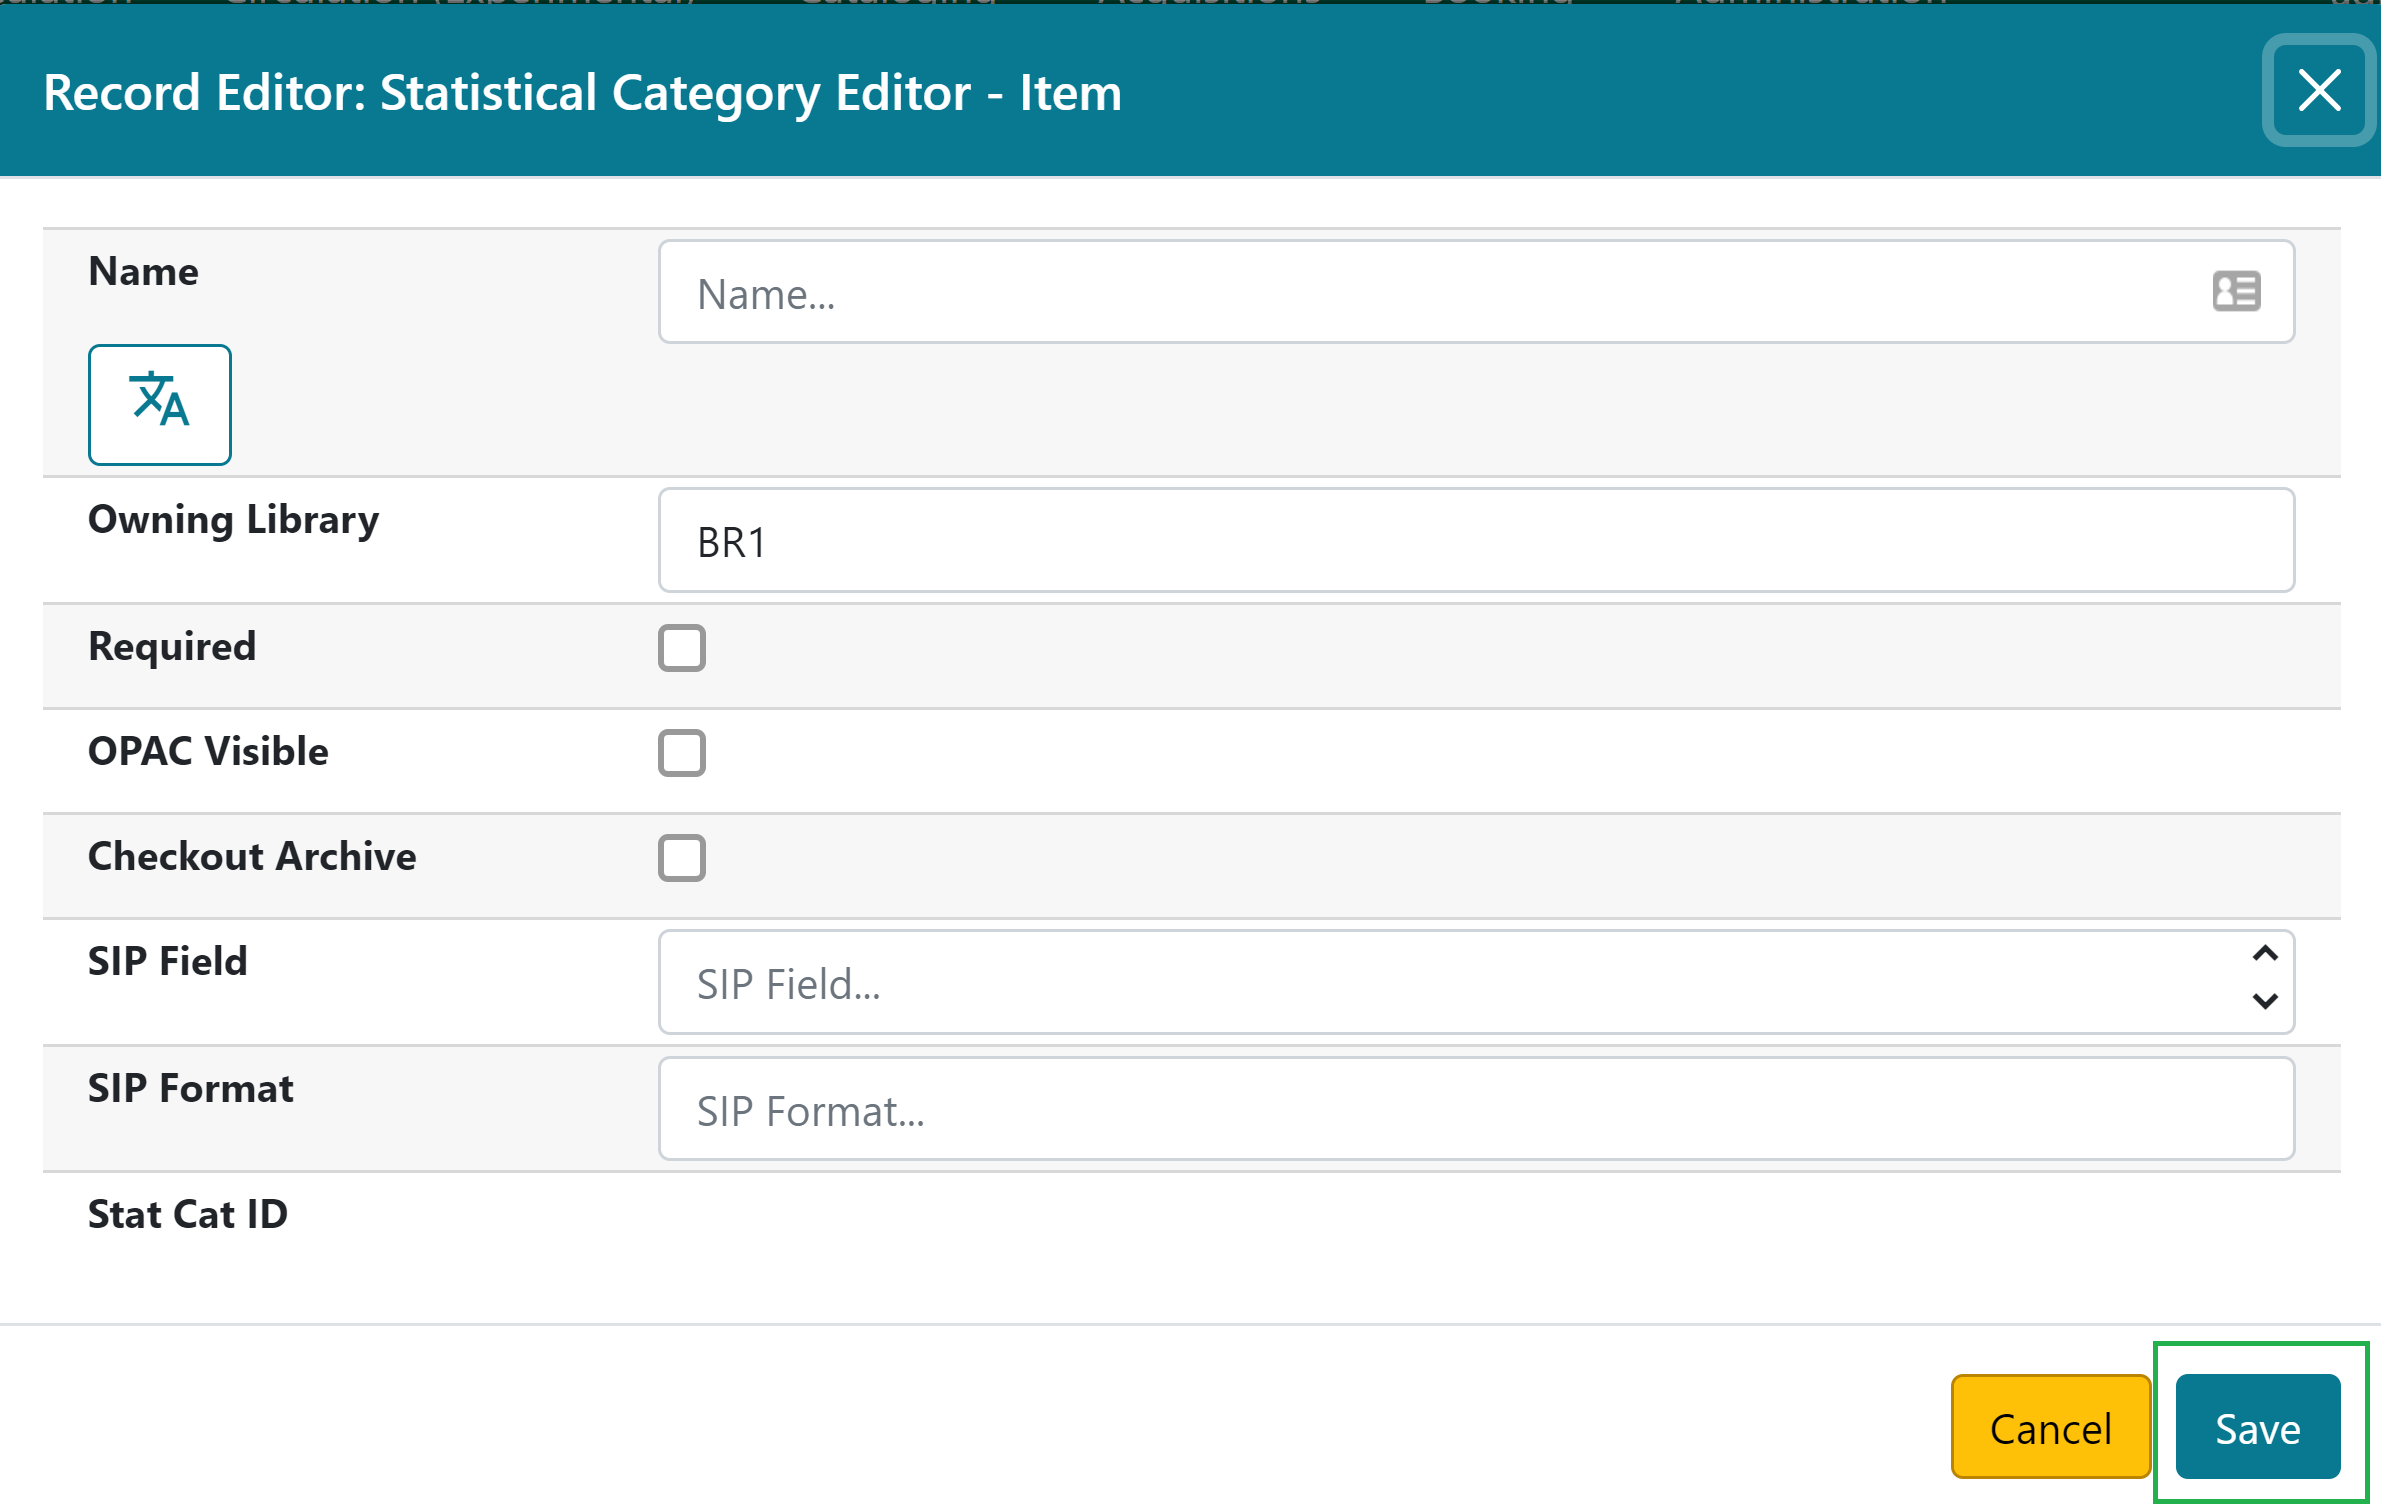
-
Click Save.
Assigning Stat Cats
- Open the Holdings Editor for the copy you want to add a stat cat to.
- Click on the Stat Cat you want to apply a value to.
- In the Field that appears, select the value you want to apply.
- Click the Apply button.
7.6. Advanced Reader Copies and Donated Items
Indicating Special Copies, Inlcuding ARCs and Donations
On This Page
Advanced Reader Copies (ARCs) should not be cataloged in the NC Cardinal system, but may circulate locally using the Non-Cataloged Circulation function. Donation information must not appear in bibliographic records shared across the consortium; any acknowledgments of gifts should be external, using the Digital Bookplate tag type. For record-keeping, libraries can track donations with an item statistical category.
Advanced Readers Copies
Advanced Reader Copies (ARCs) or Advanced Reading Editions (AREs) are promotional materials sent out prior to publication. They are generally marked as such and usually marked "Do Not Sell". Libraries should not add these items to the NC Cardinal catalog. Some libraries may choose to circulate these locally as Non-Cataloged paperback books or in a local Non-Cataloged type created specifically for these item types.
Donations
Library system specific information including gift or donation information should not be included in bibliographic records within NC Cardinal, which are shared by the entire consortium. Catalog the item as you would normally, following the recommended MARC templates for the item type (i.e., book, Blu-ray, etc.). NC Cardinal recommends that libraries use a book plate, plaque, or some other form of acknowledgment for gifted items OUTSIDE of the catalog.
For Internal Records
If Libraries wish to keep records of donated items:
- Create an item statistical category. For example: donation: yes/no
- Use an Excel spreadsheet to track donations
- Create a COPY-level item note for each individual barcode. These notes should not be made public.
For Public Facing Information
Libraries who wish to indicate in the public catalog that an item was donated should use the Digital Bookplate Item Tag. Please see the page on Item Tags for instructions on using digital bookplates.
8. Transferring Holdings
8.1. Transferring Items
Moving Items to Different Call Numbers or Branches
On This Page
When items need to be moved to different, already existing call numbers in your library, or a new branch within your system, you can transfer items and holdings between call numbers and branches in the holdings view of the bibliographic record by marking the destination, and selecting transfer from the actions menu.
In cases where items are being moved around your library, such as from a juvenile shelving location to a YA shelving location, items may be transferred between existing call numbers. Additionally, items moving between branches may be transferred to the new branch. Transfers are conducted from the Holdings View in the bibliographic record.
Transferring Between Call Numbers at the Same Branch
- Navigate to the Bibliographic Record for the item you want to transfer.
- Click into the Holdings View tab.
- Scope to the branch where both the original call number and the new call number are located.
- Check the box next to the call number you want to transfer to.
- From the Actions menu, select Mark Library/Call Number as Transfer Destination.
- Uncheck the destination call number, and expand the original call number by clicking on the carot. This will make the barcoded item visible.
- Check the box next to the barcode to select the copy to be moved.
- Select Transfer Items to Marked Destination from the Action Menu.
You can check if the transfer was successful by expanding the new call number to see if the barcode is visible attached to the new call number. If The transferred copy was the only one attached to the original call number, that call numbe will no longer appear in the list.
If you need to create a new call number to transfer copies to, follow the instructions listed in the Dummy Call Number page.
Transferring Holdings Between Branches
- Navigate to the Bibliographic Record for the holdings you want to transfer.
- Click into the Holdings View tab.
- Scope to your system.
- Check the box next to the branch you want to transfer to.
- From the Actions menu, select Mark Library/Call Number as Transfer Destination.
- Uncheck the destination branch, and expand the original branch by clicking on the carot. This will make the call number visible.
- Check the box next to the call number to select the holdings to be moved (selecting the call number will select both the volume and copy).
- Select Transfer Holdings to Marked Destination from the Action Menu.
Note: If there are multiple copies attached to the call number being transferred, all copies will be moved along with the call number.
8.2. Transferring Holdings to New Records
Moving Holdings onto a Different Bibliographic Record
On This Page
Item catalogers can move items to different records by marking the destination record, then transferring the item to the marked record.
In cases where an item has been attached to the wrong biblioraphic record, such as a large print item attached to a regular print record, you can move the incorrect item to the correct record through a transfer.
To Move Holdings
- Navigate to the bib record that you're moving the materials to.
- From the Mark For menu, choose Holding Transfer.
- Once you've done so, you can go back to the Mark For drop down menu and see the TCN of the record marked as the destination.
- Navigate to the bib record of the material you're transferring. Click into the Holdings View tab.
- Select the row with the Call Number record of the material you're transferring and check the checkbox of the Call Number row (not the row where the barcode is)
- From the Actions menu, choose "Transfer Holdings to Marked Destination"
8.3. Transferring Pre-Cataloged Items
Brief Pre-Cataloged Items
On This Page
Items that are not properly cataloged before shelving may be circulated to patrons using the pre-cat feature. Once a pre-cataloged item is returned, it can be attached to the correct bib record using the mark/transfer function.
The pre-cataloged circulation function allows staff to temporarily circulate items that are uncataloged. Evergreen has a special bibliographic record designated to accept these temporary item records. This type of "placeholder" circulation is meant to be used temporarily to lend the uncataloged material to a patron until it can be returned and cataloged properly. This type of circulation should be used sparingly if the item isn't intended to be added to the catalog later (such as interlibrary loans) since the record still needs to be cleaned up after the loan.
Pre-cataloged items are not OPAC visible and have limited display in the staff client, so once the physical pre-cataloged items are returned to the owning library, they should be routed to cataloging. A cataloger may transfer the temporary item record to a permanent call number and bibliographic record to preserve the circulation count and retain use of the barcode. Item barcodes cannot be reused in Evergreen once the item utilizing that barcode has been deleted.
Pre-Cat Library Settings
By default, when a pre-cataloged item is created, Evergreen sets the Circ Library field to the library where it was checked out. You may change this so that the circ library is set to a different library. This can be helpful in cases where the cataloger who fixes pre-cataloged items is at another library, and you’d like all pre-cataloged items to be routed to that cataloger’s library when they are returned.
- Go to Administration > Local Administration > Library Settings Editor.
- Choose Pre-cat Item Circ Lib.
- Click Edit.
- Select the appropriate context. For example, if all pre-cataloged items in your system should have the same circ library, you should choose your system as the context.
- Type in the shortname of the library that should be in the circ lib field. Make sure to type this correctly, or Evergreen won’t be able to create pre-cataloged items.
Pre-cataloged Item Status
There are several differences in the structure of pre-cataloged records. Evergreen always sets the owning library of pre-cataloged items to be the consortium. The bibliographic record designated for pre-cataloged items (TCN and Database ID: -1) does not have much MARC data and is invisible in the staff client and OPAC.
DO NOT edit the item record while it is attached to the -1 bib record, as it is owned by Cardinal and editing it before transfer causes problems for all the other library systems that also have pre-cataloged circulations. You may transfer the pre-cat item record for your barcoded item to a bibliographic record (following the Transfer item record(s) only instructions below), then make the appropriate edits to the item record that will now be owned by the branch library you transferred it to.
Moving a Pre-Cat Item to the Correct Bib Record
Once you receive the material back from the patron, check it in and send it to a cataloger. Catalogers should identify the correct bibliographic record for the pre-cat item to be on. If a call number record already exists for that title at the branch the pre-cat item will belong to, you can skip to step 4 below.
- Locate the bib record you want to attach the item to. Navigate to the Holdings View tab.
- If no call number record exists to transfer the item to, select the branch where you will be adding the item.
- Add a new call number and attach a dummy barcode of TEMP[barcode of the item you are transferring].
- Click Apply All & Save.
- Return to the Holdings View and select the newly created call number.
- Click the checkbox next to the row for the call number and go to the Actions drop down menu and choose Mark Library/Call Number as Transfer Destination. This indicates that the call number you selected is the one you're getting ready to transfer an item to.
- Return to the item status screen where you have your item information and choose Transfer Items to Previously Marked Call Number.
- Navigate back to the Holding View and check to make sure the item is now attached to the correct call number.
- Delete the dummy item.
- Edit Item Attributes as needed.
8.4. Dummy Call Numbers
Creating a Dummy Barcode on a Call Number for Transfers
On This Page
When transferring items between records, a call number is required. Most items have a call number, however, there are two circumstances where a full holdings record can't be transferredand item catalogers need to create a call number prior to transferring the item.
When transferring items between records, a call number is required. Most items have a call number, and the full holdings record may be transferred. However, there are two circumstances where a full holdings record can't be transferred:
- When a call number at one branch has multiple items attached, and only one item needs to be moved to a branch that does not have a call number for that item.
- When a pre-cat item is being attached to its permanent record.
In either case, item catalogers need to create a call number prior to transferring the item.
Access the Holding Editor for a Dummy Item
- In the destination record, click on the Holdings View tab.
- Check the boxes to Show Empty Libs and Show Empty Call Numbers.
- Scope to the branch where the new holdings will live.
- Check the box for the destination branch.
- From the Actions menu, select Add Call Numbers.
This will take you into the holdings editor for a new item attached to the bib record.
Adding the Dummy Item in the Holdings Editor
- Edit the call number to the correct number as it should be.
- Add a dummy (fake) barcode.
- Do not edit any item attributes.
- Click the Apply All, Save & Exit button at the bottom of the page.
The Call Number with a dummy item will now be visible in the Holdings View.
Complete the Transfer
At this point, follow the steps to either transfer the pre-cat item to the correct record or move the single item without it's call number to a different branch. The basic process is:
- Locate the newly created call number in the Holdigns View list.
- Check the box to select it.
- From the Actions Menu, choose Mark Library/Call Number as Transfer Destination.
- In the Item Status screen, scan the barcode for the item to be transferred.
- Check the box to select the item from the grid.
- From the Actions menu, choose Transfer Items to Previously Marked Call Number.
Note: When transferring pre-cat items, you will need to navigate to the holdigns editor and apply all the correct item attributes, then check the item in again to make it available.
9. Item Buckets
9.1. Managing Item Buckets
Creating and Editing Item Buckets
On This Page
Staff can use item buckets to easily perform batch actions for a number of item records at the same time. Items remain in buckets until they are removed, but are not restricted in any way from checking out, fulfilling holds, etc. The Item Bucket interface is accessed by going to Cataloging → Item Buckets.
Item buckets are a way to conveniently group a list of item records. Staff can use item buckets to easily perform batch actions for a number of item records at the same time. Items remain in buckets until they are removed, but are not restricted in any way from checking out, fulfilling holds, etc.
The Item Bucket interface is accessed by going to Cataloging → Item Buckets.
Note: The words copy and item may be used interchangeably in Evergreen.
Creating Item Buckets
Item buckets can be created in the Item Bucket interface as well as on the fly when adding items to a bucket from a catalog search or from within the Item Status interface. For information on creating buckets on the fly see Adding Items to a Bucket.
-
In the Item Bucket interface click on Buckets in either the Pending Items or Bucket View tab.
-
From the drop down menu select New Bucket.
-
Enter a Name and a Description (optional) for your bucket and click Create Bucket.
Note: Checking the Shareable box makes the bucket visible and searchable by any staff member who has the bucket ID number.
Editing Item Buckets
- In the Item Bucket interface click Buckets in either the Pending Items or Bucket View tab.
- From the drop down menu select the bucket you would like to edit. The bucket will load in the interface.Click on Buckets.
- From the drop down menu select Edit Bucket.
- Update the desired information and click Apply Changes.
Deleting Item Buckets
In the Item Bucket interface click Buckets in either the Pending Items or Bucket View tab.
- From the drop down menu select the bucket you would like to delete. The bucket will load in the interface.
- Click on Buckets.
- From the drop down menu select Delete Bucket.
- On the confirmation pop up click Delete Bucket.
- Refresh your screen.
9.2. Customizing Item Buckets
Options for Customizing Bucket Grids
On This Page
Item Buckets utilize Angular grids, and can be customized to change coulmn order, add or remove columns, and change column widths.
As with other pages in the Evergreen Angular Interface, you may select which columns you would like to have visible in your Item Buckets.
To change column order
- Click on the Carrot menu at the top of the grid.
- Select "Manage Columns."
- Columns are ordered top to bottom, corresponding with left to right. i.e. the top column in the list will be the left-most column in the grid.
- Move columns up and down to change their order left to right.
- Make a column the first (left-most) column immediately, regardless of current position, by clicking the "First Visible" arrow.
- Add additional, non-visible columns to the grid by clicking on them in the list. The icons will change from a from a yellow x to a green check-mark.
- Click the Close button when done.
To add columns
If you want to add visible columns without opening the Manage Columns option:
- Click on the Carrot menu at the top of the grid.
- Select the category you would like to have visible from the drop-down list.
- The grid will automatically update to include the new column.
- If you re-open the menu, the icon next to the category will have changed from a yellow x to a green check-mark.
To remove columns
- Click on the Carrot menu at the top of the grid.
- Select the category you would like to hide from the drop-down list.
- The grid will automatically update to remove the selected column.
- If you re-open the menu, the icon next to the category will have changed from a green check-mark to a yellow x.\
To adjust width
If longer data, such as titles or barcodes are cut off in you grid, you can adjust the column width.
- Click on the Carrot menu at the top of the grid.
- Select "Manage Column Widths."
- Two new rows, to Expand and Shrink, will show up at the top of the grid.
- Widen a column by clicking on the outward facing arrows.
- Narrow a column by clicking on the inward facing arrows.
- Re-open the menu and click "Manage Column Widths" again to close the Expand and Shrink rows.
To save grid set-up
- Click on the Carrot menu at the top of the grid.
- Select "Save Columns."
- The columns you have selected to be visible will now be visible by default, as well as any changes you have made to the order or width, every time you return to any bucket in your bucket view.
9.3. Adding Items to an Item Bucket
Four Methods for Adding Items to an Item Bucket
On This Page
There are four options for populating item buckets with items: from the Item Bucket interface directly, from the Bibliographic Record to which the item is attached, by scanning individual items barcodes in the Item status screen, and by uploading a file containing a list of barcodes to the Item Status screen.
There are four different methods for adding items to buckets. A single bucket may have items added using all four different methods.
From the Item Bucket Interface
- In the Item Bucket interface click on the Pending Items tab. Click on Buckets.
- From the drop down menu select the bucket you wish to add the items to. Alternatively you can create a New Bucket.
- Scan in all of the items you wish to add to the bucket.
- The number of items in the bucket, displayed beside the bucket name, will update as will the number on the Bucket View tab.
Note: Staff can also scan in pending items without first selecting a bucket. Items from the pending list may then be added to multiple buckets by selecting Add to Bucket from the Actions menu and choosing the correct bucket for each subset of items.
From a Bibliographic Record
- Retrieve the desired title through a catalog search.
- If it is not your default view click on the Holdings View tab.
- Use the check boxes to select the item(s) you would like to add to the bucket.
- Click Other Actions menu button below the Record Summary.
- From the drop down menu select Add to Bucket
- To add the item to an existing bucket, select the one you wish to add to from the drop down menu in the pop up box.
- To create a new bucket, select the New bucket tab and enter a name for your bucket.
- Repeat steps 1 through 7 to add additional items from other bibliographic records, as needed.
Scan barcodes in the Item Status screen
- Click on Search → Search for Items by Barcode
- Scan the barcode(s) of the item(s) you wish to add to the bucket.
- Make sure that the items you want to add are selected (i.e. box on the left side of the screen is checked).
- Right click on one of the selected items or go to the Actions menu.
- Click Add items to bucket.
- Choose an existing bucket or create a new bucket.
Upload file of barcodes in the Item Status screen
- Run report to get a list of barcodes that you want to edit or delete using an item bucket (e.g. Lost items more than x years overdue)
- Save only the necessary barcodes in either a .txt or .csv file. Barcodes must be on separate lines and may be comma separated.
- Click on Search → Search for Items by Barcode
- Click Choose File and select your saved .txt or .csv file of barcodes.
- A successful file upload will display each barcode as a line item.
- Make sure that the items you want to add are selected (i.e. box on the left side of the screen is checked).
- Right click on one of the selected items or go to the Actions menu.
- Click Add items to bucket.
- Choose an existing bucket or create a new bucket.
Note: Uploading files with extraneous data (other than barcodes) or punctuation other than commas will result in errors.
9.4. Removing Items from an Item Bucket
How to Remove Items from a Bucket
On This Page
Users may remove items from an item bucket as an option in the Actions Menu when the bucket is open.
-
Open the Item Bucket interface. By default you are on the Bucket View tab.
-
Click on Buckets.
-
From the drop down menu select the bucket containing the item(s) you would like to remove. All items in the bucket will display.
-
Use the check boxes to select the item(s) you wish to remove from the bucket.
-
Right click on one of the selected items or go to the Actions menu.
-
From the drop down menu choose Remove Selected Items from Bucket.
- Your bucket will reload and the selected item(s) will no longer be in the bucket.
9.5. Placing Holds on Items in an Item Bucket
How to Place Batch Holds Using Item Buckets
On This Page
To place holds on multiple titles for a single user, the Item Buckets Batch Holds feature is recommended.
Evergreen offers multiple options for placing holds in batch:
- The Multiple Hold function allows a single account to request multiple copies of the same title.
- The Hold Groups function allows staff to place holds on the same title for multiple users at once.
The Bucket Hold action is recommended when placing holds on multiple titles for a single user. To place batch holds from an Item Bucket:
-
Open the Item Bucket interface. By default you are on the Bucket View tab.
- Click on Buckets.
-
From the drop down menu select the bucket containing the item(s) you would like to place a hold on.
- Use the check boxes to select the item(s) you wish to place holds on.
- Click Actions.
-
From the drop down menu select Request Selected Items.
-
Enter the barcode for the patron who the hold is for. By default the system enters the barcode of the account logged into the client.
- Select the correct Pickup Library.
- Select the correct Hold Type.
- Click OK.
- The hold has been placed.
9.6. Editing Items in an Item Bucket
How to Edit Items in a Bucket
On This Page
Catalogers can use Item Buckets to make batch changes of item attributes.
Item Buckets allow catalogers to make changes to item attributes for multiple items at once.
-
Open the Item Bucket interface. By default you are on the Bucket View tab.
-
Click on Buckets. From the drop down menu select the bucket containing the item(s) you would like to edit. All items in the bucket will display.
-
Use the check boxes to select the item(s) you wish to edit.
-
Right click on one of the selected items or go to the Actions menu.
-
From the drop down menu choose Edit Selected Items.
-
The Holdings Editor will open in a new tab. Make your edits (see Editing or Weeding Items and/or Editing and Deleting Item and Call Number Records).
-
Once you choose Save and Exit in the Holdings Editor, the updates to the edited items will show in the item bucket.
9.7. Deleting Items in an Item Bucket
How to Delete Items in a Bucket from the Catalog
On This Page
Item catalogers can delete multiple items from buckets, which is beneficial for collaborative projects like weeding. To delete items, access the Item Bucket interface, select the desired bucket, ensure relevant statuses are displayed, choose items using check boxes, and then confirm deletion through the Actions menu.
Item Catalogers can delete multiple items at once from buckets. Buckets are also useful if other staff members will be making a list of items to be deleted, such as during a weeding project. Item catalogers should only delete items that belong to their library system and do so in accordance with their library system policies. There is no way to undo the action once an item record is deleted, so be sure that you are following Cataloging best practices for deleting items: see Editing and Deleting Item and Call Number Records.
Note: Do not delete the last item from a bibliographic record if you intend to replace that item. When the last item on a call number record is deleted, the call number record is also automatically deleted. If the last item on a bibliographic record is deleted, both the call number record and the bibliographic record is deleted.
Delete Items from Bucket
- Open the Item Bucket interface. By default you are on the Bucket View tab.
- Click on Buckets. From the drop down menu select the bucket containing the item(s) you would like to delete. All items in the bucket will display.
- Be sure to display Is Deleted and Copy Status from the column picker. Staff should never attempt to delete items in a status indicating an open transaction: see Editing and Deleting Item and Call Number Records
- Use the check boxes to select the item(s) you wish to delete.
- Right click on one of the selected items or go to the Actions menu.
- From the drop down menu select Delete Selected Items from Catalog.
- On the confirmation pop up click OK/Continue.
- The items have been deleted from the catalog.