NC Cardinal Support and Staff Education
  • Home
  • Submit a Request
  • Check on a Request
  • Knowledge Books
    • About NC Cardinal
    • Circulation in Evergreen
    • Cataloging in NC Cardinal
    • Patron Account Management
    • Administration Manual for Libraries
    • Reports in Evergreen
    • Resource Sharing
    • Student Access Initiative
    • Acquisitions in Evergreen
    • Serials in Evergreen
    • Offline Transactions
    • Evergreen Upgrades
    • Libraries Migrating into NC Cardinal
    • Summon Documentation
    • Troubleshooting in Evergreen
HelpSpot help desk software

Home → Cataloging in NC Cardinal → Bibliographic Record Buckets → Record Bucket Actions

8.4. Record Bucket Actions

Last Updated 10/29/2025


Individual Record Bucket Actions

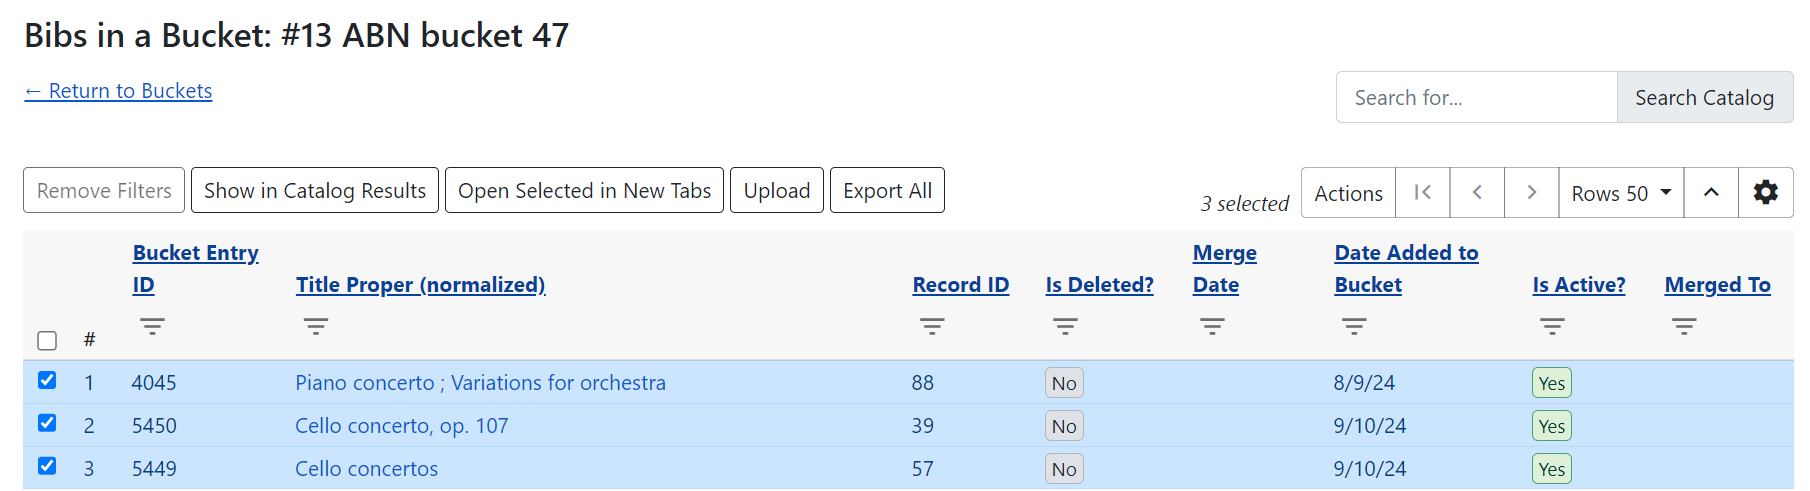
To access an individual bucket, click on its title in the main buckets interface. This will take you to the Bibs in a Bucket view, where you can see all members of the record bucket and perform actions on them. This grid has filters and sort options available on each column, and as with other grids you can save your grid view.

Individual record bucket view

This interface has several actions available, some via buttons and some via the actions menu.

Buttons include:

  • Remove Filters - this will remove all grid filters that are in place.

  • Show in Catalog Results - this will open all selected records in a staff catalog search results page. This will open in a new tab.

  • Open Selected in New Tabs - this will open each selected record in its own tab, and show you the record detail view for each record.

     
  • Upload - this opens the Upload Records modal described above.

  • Export All - this exports all members of the bucket in either USMARC or MARCXML format. If you select this option you will see a modal with export options and the ability to confirm before you process the export.

For more information on the Search Catalog box on the right of the interface, see the above description.

Additional actions are available in the actions menu, and all may be performed on one or several records, with the exception of Merge Selected Records, which is explained in greater detail below.

Additional actions include:

  • Add Selected Records to a Different Bucket - this will copy selected records from the current bucket into a new or existing bucket for which you have edit permissions

  • Delete Selected Records from Catalog - if you have appropriate delete permissions you can delete records from the catalog. Note that this will only work for 'empty' records - any records with holdings or items attached will be blocked from deletion.

  • Export Selected Records - this functions the same as Export All described above, but allows you to select specific records for export.

  • Merge Selected Records - this is described in detail in the next section.

  • Move Selected Records to a Different Bucket - this will move selected records from the current bucket into a new or existing bucket for which you have edit permissions

  • Transfer Title Holds - this will transfer all title-level holds from the selected record to a pre-selected holds transfer destination record. For more information on setting a holds transfer destination, please see the Holds Management documentation.

Columns in this view include:

  • Bucket Entry ID - a unique identifier related to the record + bucket combined. The presence of this ID uniquely identifies each record as a bucket member, even if a record is added to the bucket twice. This allows users to add or remove duplicate records from the bucket.

  • Title Proper (normalized) - the title of the bibliographic record. It is a hyperlink, and clicking it will take you to the record detail view for that bibliographic record. This will open in the same tab.

  • Record ID - the system bibliographic record ID

  • Relative Position - the position of the record in a bookbag

  • Is Deleted? - indicates if the bibliographic record is deleted or not

  • Merge Date - the date a bibliographic record as merged

  • Author (normalized) - the author of the bibliographic record

  • Bucket ID - the ID of this bucket

  • Date Added to Bucket - the date the bibliographic record was added to this bucket

  • TCN Source - the source of the bibliographic record’s TCN (Title Control Number)

  • TCN Value - the bibliographic record’s TCN (Title Control Number)

  • Record Creation Date/Time - the creation date of the bibliographic record

  • Last Edit Date/Time - the date the bibliographic record was last edited

  • Is Active? - indicates if a bibliographic record is active or not

  • Merged To - if the record has been merged, this will show the Record ID of the bibliographic record which was the merge destination (AKA Lead Record). This is hyperlinked and clicking on it will take you to the lead record.

  • Overall Record Quality - the calculated quality score of the bibliographic record

Bibliographic Record Merging and Overlay

You can merge or overlay records in record buckets, either as a way to resolve catalog duplicates or by using a set of records from an external service like Z39.50.

Merge Records in Record Buckets

  1. Navigate to Cataloging>Record Buckets.

  2. Create and/or select a record bucket.

  3. Select the records that you want to merge, and click Actions → Merge Selected Records.

  4. This will open a new tab showing the Merge Records modal.

  5. The records to be merged appear on the right side of the screen. Select Use as Lead Record to select a lead record from those that need to be merged.

    Merge Selected Records interface with records to be merged displayed on the right side.
  6. Select a merge profile from the drop down box.

    Dropdown box for selecting a merge profile.
  7. After you select the profile, you can preview the changes that will be made to the record.

    Preview of changes that will be made to the record after selecting a merge profile.
  8. You can change the merge profile at any time; after doing so, the result of the merge will be recalculated. The merge result will also be recalculated after editing the lead record, changing which record is to be used as lead, or removing a record from consideration.

  9. When you are satisfied that you have selected the correct merge profile, select the Merge button in the bottom right corner.

  10. Note that merge profiles that contain a preserve field specification are not available to be chosen in this interface, as they would have the effect of reversing which bibliographic record is considered the target of the merge.

After the merge is complete, you will be returned to your record bucket. You will see that the record(s) participating in the merge have an updated Merge Date value. All non-lead records will be marked as deleted = yes, active = no, and will have the lead record’s ID in the Merged To field.

Track Record Merges

When two or more bibliographic records are merged in a record bucket, all records involved are stamped with a new merge_date value. For any bibliographic record, this field indicates the last time it was involved in a merge. At the same time, all subordinate records (i.e. those deleted as a product of the merge) are stamped with a merged_to value indicating which bibliographic record was the lead record in the merge.

In the staff catalog bibliographic record display, a warning alert now appears along the top of the page below the Deleted alert indicating when a record was used in a merge, when it was merged, and which record it was merged with, rendered as a link to the lead record.

merge message with date

Merge Records Using Z39.50

  1. Search for a record in the catalog that you want to overlay.

  2. Select the record, and select MARC View.

  3. Select Mark for: Overlay Target.

    Option to mark a record for overlay target in the MARC view.
  4. Navigate to Cataloging → Import Record from Z39.50.

  5. Search for the lead record that you want within the Z39.50 interface.

  6. Select the desired lead record, and select Overlay.

  7. The record that you have targeted to be overlaid, and the new record, display side by side.

    Side-by-side comparison of the targeted record and the new record in the Z39.50 interface.
  8. You can edit the lead record before you overlay the target. To edit the record, select Edit Z39.50 Record above the lead record.

  9. The MARC editor will open. You can make changes in the MARC editor, or you can select the Flat Text Editor to make changes. After you have edited the record, select Modify in the top-right corner, and then Use Edits in the bottom-right corner. Note that the record you are editing is the version from the Z39.50 server not including any changes that would be made as a result of applying the selected merge file.

  10. You will return to the side-by-side comparison of the records and then can proceed with the overlay.

  11. Once you are satisfied with the record that you want to overlay, select a merge profile from the drop down box.

  12. Select Overlay. The overlay will occur, and you will be taken back to the Z39.50 interface.

  13. Note that the staff client remembers the last merge overlay profile that you selected, so the next time that you open the interface, it will default to that profile. Simply change the profile to make a different selection.

  14. Also note when the merge profile is applied, the Z39.50 record acts as the target of the merge. For example, if your merge profile adds 650 fields, those 650 fields are brought over from the record that already exists in the Evergreen database (i.e., the one that you are overlaying from Z39.50).

  15. Also note that merge profiles that contain a preserve field specification are not available to be chosen in this interface, as they would have the effect of reversing which bibliographic record is considered the target of the merge.

Administrative Settings for Record Merging

  1. Navigate to Administration → Local Administration → Library Settings Editor → Default Merge Profile (Z39.50 and Record Buckets).

  2. Select a context organizational unit and a default merge profile, and select Update Setting. The merge profiles that appear in this drop down box are those that are created in MARC Batch Import/Export. Note that catalogers will only see merge profiles that are allowed by their organizational unit and permission

This page was: Helpful | Not Helpful


NC Cardinal is supported by the Institute of Museum and Library Services under the provisions of the federal Library Services and Technology Act (LSTA), as administered by the State Library of North Carolina, a division of the Department of Natural and Cultural Resources.